Lorenzo Bettini is an Associate Professor in Computer Science at the Dipartimento di Statistica, Informatica, Applicazioni "Giuseppe Parenti", Università di Firenze, Italy. Previously, he was a researcher in Computer Science at Dipartimento di Informatica, Università di Torino, Italy.
He has a Masters Degree summa cum laude in Computer Science (Università di Firenze) and a PhD in "Logics and Theoretical Computer Science" (Università di Siena).
His research interests cover design, theory, and the implementation of statically typed programming languages and Domain Specific Languages.
He is also the author of about 90 research papers published in international conferences and international journals.
This is a brief article for installing exa in Arch Linux with an additional package for the icon fonts (in a few installations, boxes were shown instead of icons, that’s why I’m writing this blog article, hoping to save you some time).
Installing exa in Arch is just a matter of running:
1
sudo pacman-Sexa
However, you need a “Nerd” font to get the icon symbols. This is the one I install:
1
sudo pacman-Sttf-arimo-nerd
In EndeavourOS KDE, this should already be installed. I seem to understand that this is not the case for EndeavourOS GNOME. If these fonts are not installed, you can install them with the command above and make sure to reboot.
The output is excellent, and I aliased many of my previous ls commands to exa:
1
2
3
aliasl='exa -lah --color=always --group-directories-first --icons'# with headers
alias la='exa -al --color=always --group-directories-first --icons'# all files and dirs
alias ll='exa -l --color=always --group-directories-first --icons'# long format
This is the beautiful colored output you get, and note the icons for directories and known files types in Gnome (in particular, a “cup of coffee” for Java files):
The same holds for KDE:
I also have another alias for the tree output of exa:
1
alias lt='exa -aT --color=always --group-directories-first --icons'# tree listing
And this is the output:
Note the “–git-ignore” command line argument to ask exa to skip all the files that match the patterns in the current “.gitignore” file.
In Arch Linux (and Arch-based distros like EndeavourOS), it’s easy to add a network printer if you already know its address. Still, network printer discovery does not work out of the box as it happens on other distributions like Fedora or Ubuntu.
The procedure to enable network printer discovery is, of course, documented in the Arch wiki. Still, in this post, I’d like to detail the steps to achieve that just as a confirmation or as additional help documentation.
First of all, let’s install the packages for printing:
1
cups cups-filters cups-pdf cups-pk-helper libcups
I also install the following packages for drivers and HP (because I have HP printers):
We must also make sure the following packages (“avahi” and “nss-mdns”) are installed:
1
2
3
4
extra/avahi ... (Installed)
Service Discovery for Linux using mDNS/DNS-SD -- compatible with Bonjour
extra/nss-mdns ... (Installed)
glibc plugin providing host name resolution via mDNS
And that the “avahi-daemon.service” is running and enabled:
1
2
sudo systemctl start avahi-daemon
sudo systemctl enable avahi-daemon
Then, we must edit the file “/etc/nsswitch.conf” and change the line
1
hosts: mymachines resolve [!UNAVAIL=return] files myhostname dns
into
1
hosts: mymachines mdns_minimal [NOTFOUND=return] resolve [!UNAVAIL=return] files myhostname dns
Now, we should be able to discover local network printers.
I prefer the “system-config-printer” package for this purpose (in case you want to install it).
You can run it by searching for the application “Print Settings”. I’m showing an example in KDE:
“Unlock” by providing the password, press “Add,” and expand the “Network Printer”. If you have a firewall, like “firewalld”, you’ll be asked again for the password to change the firewall settings to enable the services for printer discovery:
Of course, you have to accept to adjust the firewall.
Then, the local network printer(s) should be discovered. In my example, my HP printer is discovered with the possible network protocols:
I chose the second one (the one with the local IP address) and HPLIP as the connection protocol (remember I had already installed the corresponding packages):
By pressing “Forward”, you wait for the drivers to be selected. You can print a “test page” and configure the printer as you see fit.
19 February 2023: exclude ansible-lint problems on tests/test.yml
27 April 2023: updated the molecule docker plugin
Last year, I got familiar with Ansible, the automation platform I now use to install and configure my Linux installations. I must thank Jeff Geerling and his excellent book “Ansible for DevOps“, which I highly recommend!
In this blog post, I’d like to document the use of Ansible and Molecule with a slightly more advanced example and how to test an Ansible role against 3 main Linux distributions, Fedora, Ubuntu, and Arch. To test the Ansible role, we will use Molecule and Docker. Finally, I’ll show how to implement a continuous integration process with GitHub Actions. The example consists of a role for installing zsh, setting it as the user’s default shell, and creating an initial “.zshrc” file. It will be a long post because it will be step-by-step.
I’m assuming Docker, Python, and Pip are already installed.
First, let’s install Ansible and Molecule (with Docker support). We’ll use pip to install these tools. This method works on all distributions since it’s independent of the ansible and molecule packages provided by the distribution (Ubuntu does not even provide a package for molecule):
What I do next is to enter the directory, remove “.travis.yml” (since we want to build on GitHub Actions), and create a Git repository (with “git init”). I’m also pushing to GitHub.
First, let’s adjust the file meta/main.yml with the information about this role and author:
YAML
1
2
3
4
5
galaxy_info:
role_name: zsh_role
author: Lorenzo Bettini
namespace: lorenzobettini
description: Install ZSH and set it as the user's shell
The role’s name should be the same as the one specified in the “init” command (I don’t know why this file has not been generated with the role_name already set). Otherwise, the other generated files for Molecule will not work.
The role’s main tasks are defined in tasks/main.yml. Currently, the generated file does not execute any task.
Manual tests
The “init” command also created a tests directory to manually and locally test the role. We are interested in automatically testing the role. However, since the role is currently empty, it is safe to try to run it against our own machine. At least, we can check that the syntax of the role is OK, and we can perform a “dry-run” without modifying anything on our machine.
The current contents of the files generated in the “tests” directory will not work out of the box.
First, the tests/test.yml playbook:
YAML
1
2
3
4
5
---
- hosts: localhost
remote_user: root
roles:
-zsh_role
Correctly refers to our role, but ansible will not be able to find the role in the default search path (because the role is the project’s path).
We can change the role reference with a relative path (the use of a relative path will require a few configurations to make linting happy, as we will see later):
YAML
1
2
3
4
5
6
---
- name: Test the role locally
hosts: localhost
remote_user: root
roles:
-../..
Then, we can try to run it, checking the syntax and doing a “dry-run”:
fatal: [localhost]: UNREACHABLE! => {"changed": false, "msg": "Failed to connect to the host via ssh: ssh: connect to host localhost port 22: Connection refused", "unreachable": true}
PLAY RECAP **************************************************************************
The “dry-run” (–check) fails because, on my machine, there’s no SSH server, and by default, the tests/inventory file (specifying “localhost”) would imply an SSH connection:
1
localhost
To avoid SSH, we can change the file as follows:
1
localhost ansible_connection=local
Let’s try again with the “–check” argument, and now it works.
Run the complete Molecule default scenario
The “init” command created a default Molecule scenario in the file default/molecule.yml:
YAML
1
2
3
4
5
6
7
8
9
10
11
12
13
---
dependency:
name: galaxy
driver:
name: docker
platforms:
- name: instance
image: quay.io/centos/centos:stream8
pre_build_image: true
provisioner:
name: ansible
verifier:
name: ansible
As we can see from this file, the Docker image used by Molecule is centos:stream8. For the moment, we’ll stick with this image.
Molecule will execute a playbook against a Docker container of this Docker image. We’re implementing a role, not a playbook. The playbook is defined in the file default/converge.yml:
YAML
1
2
3
4
5
6
7
---
- name: Converge
hosts: all
tasks:
- name: "Include lorenzobettini.zsh_role"
include_role:
name: "lorenzobettini.zsh_role"
In fact, “converge” is the action of performing the playbook against the Docker image, the “instance”. As you see, the “init” command generated this file automatically based on the role that we created.
There’s also a default/verify.yml file that is used to verify that some expected conditions are true once we run the playbook against the Docker instance. We’ll get back to this file later to write our own assertions. The contents of this generated file are as follows (the assertion is always verified):
YAML
1
2
3
4
5
6
7
8
9
10
---
# This is an example playbook to execute Ansible tests.
- name: Verify
hosts: all
gather_facts: false
tasks:
- name: Example assertion
ansible.builtin.assert:
that: true
To check that the scenario already works, we can run it end-to-end with the command “molecule test” issued from the project’s root. Remember that Molecule will download the Docker image during the first run, which takes time, depending on your Internet connection. This is the simplified output:
1
2
3
4
5
6
7
8
9
10
11
12
13
14
15
16
17
18
19
20
21
22
23
24
25
26
27
28
29
30
31
32
33
34
35
36
37
38
39
40
41
42
43
44
45
46
47
48
49
50
51
52
53
54
55
56
57
58
59
60
61
62
63
64
65
66
67
68
69
70
71
72
73
74
75
76
77
78
79
80
81
82
83
84
85
86
87
88
89
90
91
92
93
> molecule test
INFO default scenario test matrix: dependency, lint, cleanup, destroy, syntax, create, prepare, converge, idempotence, side_effect, verify, cleanup, destroy
INFO Performing prerun with role_name_check=0...
...
INFO Running default > dependency
WARNING Skipping, missing the requirements file.
WARNING Skipping, missing the requirements file.
INFO Running default > lint
INFO Lint is disabled.
INFO Running default > cleanup
WARNING Skipping, cleanup playbook not configured.
INFO Running default > destroy
INFO Sanity checks: 'docker'
PLAY [Destroy] *****************************************************************
Thus running the entire scenario always implies starting from scratch, that is, from a brand new Docker container (of course, the pulled image will be reused). Note that after “converge,” the scenario checks “idempotence,” which is a desired property of Ansible roles and playbooks. After verification, the Docker instance is also destroyed. Of course, if any of these actions fail, the lifecycle stops with failure.
Setup the CI on GitHub Actions
Our role doesn’t do anything yet, but we verified that we could run the complete Molecule scenario. Before going on, let’s set up the GitHub Actions CI workflow. We’ll use the Ubuntu runner, where Docker and Python are already installed. We’ll have first to install ansible and molecule with pip, and then we run the “molecule test”.
Concerning the pip installation step, I created the file pip/requirements.txt in the project with these contents (they correspond to the pip packages we installed on our machine):
Then, I create the file .github/workflows/molecule-ci.yml with these contents:
YAML
1
2
3
4
5
6
7
8
9
10
11
12
13
14
15
16
17
18
19
20
21
22
23
24
25
26
27
28
29
30
31
32
33
---
name: Molecule CI
on:
push:
paths-ignore:
-'**.md'
pull_request:
paths-ignore:
-'**.md'
jobs:
test:
name: Molecule
runs-on: ubuntu-latest
steps:
- name: Check out the codebase.
uses: actions/checkout@v2
- name: Set up Python 3.
uses: actions/setup-python@v4
with:
python-version: '3.x'
- name: Install test dependencies.
run: pip install -r pip/requirements.txt
- name: Run Molecule tests.
run: molecule test
env:
PY_COLORS: '1'
ANSIBLE_FORCE_COLOR: '1'
Now that our CI is in place, GitHub Actions will run the complete Molecule test scenario at each pushed commit. The environment variables at the end of the file will allow for colors in the GitHub Actions build output:
Familiarize with Molecule commands
While implementing our role, we could run single Molecule commands instead of the whole scenario (which, in any case, will be executed by the CI).
With “molecule create,” we create the Docker instance. Unless we run “molecule destroy” (which is executed by the entire scenario at the beginning), the Docker container will stay on our machine. Once the instance is created, you can enter the container with “molecule login“. This is useful to inspect the state of the container after running the playbook (with “molecule converge“) or to run a few commands before writing the tasks for our role:
The “login” command is more straightforward than running a “docker” command to enter the container (you don’t need to know its name). Remember that unless you run “molecule destroy,” you’ll find the same state if you exit the container and back in.
Once you run “molecule converge“, you can run “molecule verify” to check that the assertions hold.
To get rid of the instance, just run “molecule destroy“.
Let’s start implementing our role’s tasks
To start experimenting with Molecule for testing Ansible roles, the official Fedora Docker image is probably the easiest. In fact, such an image comes with “python” already installed (and that’s required to run Ansible playbooks). Moreover, it also contains “sudo”, another command typically used in Ansible tasks (when using “become: yes”).
Thus, let’s change the image in the file default/molecule.yml:
YAML
1
2
3
4
5
6
7
8
9
10
11
12
13
---
dependency:
name: galaxy
driver:
name: docker
platforms:
- name: instance
image: fedora:36
pre_build_image: true
provisioner:
name: ansible
verifier:
name: ansible
You can commit, push, and let GitHub Actions verify that everything is still OK.
Now it’s time to edit the primary role’s file, tasks/main.yml. Let’s add the task to install ZSH. In this example, I’m using “ansible.builtin.package module – Generic OS package manager” so that we are independent of the target OS. This is useful later because we want to test our role against different Linux distributions. This Ansible module is less powerful than the specific package manager modules, but for our goals, it is sufficient. Moreover, in the Linux distributions that we’ll test, the name of the package for ZSH is always the same, “zsh”.
YAML
1
2
3
4
5
6
7
---
# tasks file for zsh_role
- name: Install ZSH
become: yes
ansible.builtin.package:
name: zsh
state: present
If we had already created the instance, we first need to run “molecule destroy” to avoid errors due to the previous Docker container.
Let’s run “molecule converge“. If you don’t have the “fedora:36” Docker image already in your cache, this command will take some time the first time. Moreover, also the task of installing the “zsh” package might take some time since the package must be downloaded from the Internet, not to mention that dnf is not the fastest package manager on earth. In fact, the Ansible package module will use the distribution package manager, that is, dnf in Fedora. Here’s the output:
1
2
3
4
5
6
7
8
9
10
11
12
PLAY [Converge] ****************************************************************
Let’s enter the container with “molecule login“. Now, zsh should be installed in the container:
Of course, you could always run the entire “molecule test,” but that takes more time, and for the moment, we don’t have anything to verify yet. The idempotency of the Anslibe package module implies Idempotency.
Change the user’s shell and verify it
Now, we want to change the user’s shell to zsh, and we will verify it. Let’s follow a Test-Driven Development approach, which I’m a big fan of. We first write the verification tasks in verify.yml, make sure that “molecule verify” fails, and then implement the task in our role to make the test succeed.
First, how to get the user’s shell? In the Docker container, the $SHELL environment variable is not necessarily set, so we directly inspect the contents of the file “/etc/passwd” and some shell commands to get the user’s current shell. To write the shell commands, we can enter the container (molecule login), assuming we have already created the instance, and perform some experiments there. Remember that when we’re inside the container, we are “root”, so in our experiments, we’ll try to get the root’s shell.
So, we have our shell piped command to get the root’s shell:
1
grep-E"^root:"/etc/passwd|awk-F:'{ print $7 }'
In verify.yml, we want to get the shell of the user executing Ansible. In our molecule tests, it will be root, but the user will be different in the general use case. Thus, we use Ansible’s fact “ansible_user_id”:
Then, we’ll compare it against the desired value, NOT “/bin/bash”, but “/bin/zsh”. Note that, by default, the generated molecule/verify.yml has “gather_facts: false”. We need to remove or set that line to true so that Ansible populates the variable with the current user. Here are the contents (we must use the module “shell” and not “command” because we need the “|”):
As usual, we commit, push, and let the CI run the whole scenario.
The verification would not be really required since we should rely on the correctness of the Ansible user module). However, I thought this could be the moment to experiment with Molecule verification.
Note that if you enter the container, the “/etc/passwd” has been modified, but you’re still on bash. That’s because the change becomes effective when you log out and log in as a user. In a Docker container, that’s not possible, as far as I know. However, since log out and login are expected in a real system, as long as the shell is modified in “/etc/passwd”, we’re fine.
Add the file .zshrc
Since we want to set up zsh for the user, we should also add to the converged system a “.zshrc” with some reasonable defaults. For example, if you enter the container and run zsh, you’ll see that you have no command history. The history should be enabled in the file “.zshrc”.
Files are searched for in the directory “files” of the project, which the “init” command created for us. I had an existing small “.zshrc” with the enabled history, command completion, and a few aliases:
Shell
1
2
3
4
5
6
7
8
9
10
11
12
13
14
15
16
17
autoload-Uz compinit
compinit
HISTFILE=~/.histfile
HISTSIZE=1000
SAVEHIST=1000
setopt autocd beep extendedglob nomatch notify
bindkey-e
aliasgrep='grep --color=auto'
aliasl.='ls -d .* --color=auto'
aliasll='ls -l --color=auto'
aliasls='ls --color=auto'
aliasl='ls -lah'
aliasla='ls -lAh'
aliasmv='mv -i'
aliasrm='rm -i'
I put such a file in files/zshrc (I prefer not to have hidden source files, so I removed the “.”). In the role, I added this task, which copies the source file into the converged system in the current user’s home directory with the name “.zshrc”:
YAML
1
2
3
4
5
- name: Copy zshrc
ansible.builtin.copy:
src: zshrc
dest: ~/.zshrc
mode: 0644
Of course, the “copy module” is idempotent and performs the action only if the source and the target files differ.
Let’s converge, enter the Docker container and run “zsh”. Now, the command history works.
Linting
Let’s enable linting to the Molecule scenario. Remember that the scenario has an initial phase for linting.
First of all, we have to install the two additional pip packages, yamllint, and ansible-lint. In our system, we run the following:
1
pip install yamllint ansible-lint
Of course, for the CI, we have to update pip/requirements.txt accordingly, adding these two packages.
Then, we have to enable the “lint:” section in default/molecule.yml:
YAML
1
2
3
4
5
6
7
8
9
10
11
12
13
14
15
16
17
---
dependency:
name: galaxy
driver:
name: docker
lint: |
set-e
yamllint.
ansible-lint
platforms:
- name: instance
image: fedora:36
pre_build_image: true
provisioner:
name: ansible
verifier:
name: ansible
Before going on, let’s exclude our “tests/test.yml” file from ansible-lint: as mentioned above, using a relative path will make ansible-lint complain. However, for that simple test file we don’t care. So, let’s create a file “.ansible-lint” in the root directory with these contents:
YAML
1
2
3
# to avoid "role-name[path]: Avoid using paths when importing roles. (../..)"
exclude_paths:
-tests/
Now we can run “molecule lint“:
1
2
3
4
5
6
7
8
9
10
11
12
13
14
15
16
17
18
19
20
21
22
23
24
25
26
27
28
29
30
31
32
33
34
35
36
37
38
39
40
41
42
43
44
45
46
47
48
49
50
51
52
53
54
55
56
57
58
59
> molecule lint
...
INFO Running default > lint
WARNING Listing 6 violation(s) that are fatal
meta-incorrect: Should change default metadata: license
meta/main.yml:1
meta-no-info: Role info should contain platforms
meta/main.yml:1
schema[meta]: 2.1 is not of type 'string' (warning)
meta/main.yml:1 Returned errors will not include exact line numbers, but they will mention
the schema name being used as a tag, like ``schema[playbook]``,
``schema[tasks]``.
This rule is not skippable and stops further processing of the file.
Schema bugs should be reported towards [schemas](https://github.com/ansible/schemas) project instead of ansible-lint.
If incorrect schema was picked, you might want to either:
* move the file to standard location, so its file is detected correctly.
* use ``kinds:`` option in linter config to help it pick correct file type.
fqcn[action-core]: Use FQCN for builtin module actions (include_role).
molecule/default/converge.yml:5 Use `ansible.builtin.include_role` or `ansible.legacy.include_role` instead.
no-changed-when: Commands should not change things if nothing needs doing.
molecule/default/verify.yml:8 Task/Handler: Get current user's shell
risky-shell-pipe: Shells that use pipes should set the pipefail option.
molecule/default/verify.yml:8 Task/Handler: Get current user's shell
You can skip specific rules or tags by adding them to your configuration file:
# .config/ansible-lint.yml
warn_list: # or 'skip_list' to silence them completely
- experimental # all rules tagged as experimental
- fqcn[action-core] # Use FQCN for builtin actions.
- meta-incorrect # meta/main.yml default values should be changed.
- meta-no-info # meta/main.yml should contain relevant info.
- no-changed-when # Commands should not change things if nothing needs doing.
- risky-shell-pipe # Shells that use pipes should set the pipefail option.
Commit and push. Everything should work on GitHub Actions.
Note: when we created the project with “molecule init”, the command also created a “.yamllint” configuration file in the root:
YAML
1
2
3
4
5
6
7
8
9
10
11
12
13
14
15
16
17
18
19
20
21
22
23
24
25
26
27
28
29
30
31
32
33
---
# Based on ansible-lint config
extends: default
rules:
braces:
max-spaces-inside: 1
level: error
brackets:
max-spaces-inside: 1
level: error
colons:
max-spaces-after: -1
level: error
commas:
max-spaces-after: -1
level: error
comments: disable
comments-indentation: disable
document-start: disable
empty-lines:
max: 3
level: error
hyphens:
level: error
indentation: disable
key-duplicates: enable
line-length: disable
new-line-at-end-of-file: disable
new-lines:
type: unix
trailing-spaces: disable
truthy: disable
This configuration file enables and disables linting rules. This is out of the scope of this post. However, to experiment a bit, if we remove the last line “truthy: disable” and run “molecule lint,” we get new linting violations:
1
2
3
./tasks/main.yml
4:11 warning truthy value should be one of [false, true] (truthy)
10:11 warning truthy value should be one of [false, true] (truthy)
Because “become: yes” should be changed to “become: true”. I guess it’s a matter of taste whether to enable such a linting rule or not. I’ve seen many examples of Ansible files with “become: yes”. After fixing “main.yml”, there is still a warning (not an error) on the YAML file of our GitHub Actions in correspondence with the “on” line:
1
2
./.github/workflows/molecule-ci.yml
3:1 warning truthy value should be one of [false, true] (truthy)
You can find a few issues on this being considered false positive or not. A simple workaround is to add a comment in the “molecule-ci.yml” file to make yamllint skip that:
YAML
1
on: # yamllint disable-line rule:truthy
Testing with Ubuntu, the “prepare” step
Let’s say that, besides “fedora:36“, we also want to test our role against the Docker image “ubuntu:jammy“. Instead of creating a new scenario (i.e., another directory inside the directory “molecule”), let’s parameterize the molecule.yml with an environment variable, e.g., MOLECULE_DISTRO, which defaults to “fedora:36”, but that can be passed on the command line with a different value. This is the interesting part:
YAML
1
2
3
4
5
6
...
platforms:
- name: instance
image: ${MOLECULE_DISTRO:-fedora:36}
pre_build_image: true
...
Nothing changes if we run molecule commands as we did before: we still use the Fedora Docker image. If we want to try with another image, like “ubuntu:jammy”, we prefix the molecule command with that value for our environment variable.
IMPORTANT: Before trying with another Docker image, make sure you run “molecule destroy” since now we want to use a different Docker image.
Let’s try to converge with the Ubuntu Docker image…
1
MOLECULE_DISTRO=ubuntu:jammy molecule converge
What could go wrong?
1
2
3
4
5
6
7
8
9
INFO Running default > converge
PLAY [Converge] ****************************************************************
fatal: [instance]: FAILED! => {"ansible_facts": {}, "changed": false, "failed_modules": {"ansible.legacy.setup": {"ansible_facts": {"discovered_interpreter_python": "/usr/bin/python"}, "failed": true, "module_stderr": "/bin/sh: 1: /usr/bin/python: not found\n", "module_stdout": "", "msg": "The module failed to execute correctly, you probably need to set the interpreter.\nSee stdout/stderr for the exact error", "rc": 127}}, "msg": "The following modules failed to execute: ansible.legacy.setup\n"}
PLAY RECAP *********************************************************************
As I anticipated, while the Fedora Docker image comes with python preinstalled, the Ubuntu Docker image does not. The latter does not even have “sudo” installed, which is required for running our tasks with “becomes: yes”. The converge failed, but the Ubuntu image has been created so you can enter the Docker container and verify that these packages are not pre-installed.
One could try to add the tasks in the role to install python and sudo (not by using “package” because such Ansible modules require python already installed). However, this would not make sense: our role is meant to be executed against an actual distribution, where these two packages are already installed as base ones. Jeff Geerling provides a few Docker images meant for Ansible, where python and sudo are already installed. However, instead of using his Ubuntu image, let’s explore another Molecule step: prepare.
The prepare playbook executes actions which bring the system to a given state prior to converge. It is executed after create, and only once for the duration of the instances life. This can be used to bring instances into a particular state, prior to testing.
So, let’s modify this part in molecule.yml (this modification is not strictly required because if the directory of molecule/default contains a file “prepare.yml,” it will be automatically executed; it might still be good to know how to specify such a file, in case it’s in a different directory or it has a different name):
YAML
1
2
3
4
5
6
...
provisioner:
name: ansible
playbooks:
prepare: prepare.yml
...
Now, in molecule/prepare.yml we create the preparation playbook. This is kind of challenging because we cannot rely on Ansible facts nor on most of its modules (remember: they require python, which we want to install in this playbook). We can rely on the “ansible.builtin.raw module – Executes a low-down and dirty command”. And looking at its documentation, we can see that it fits our needs:
This is useful and should only be done in a few cases. A common case is installing python on a system without python installed by default.
So, here’s the prepare.yml playbook:
YAML
1
2
3
4
5
6
7
8
9
10
11
---
- name: Prepare
hosts: all
gather_facts: false
tasks:
- name: Install python in Ubuntu
ansible.builtin.raw: >
aptupdate&&\
aptinstall-y--no-install-recommendspython3sudo
when: "'ubuntu' is in lookup('ansible.builtin.env','MOLECULE_DISTRO')"
changed_when: false
Of course, we must run this task only when we are using Ubuntu (see the condition). We also specify “changed_when: false” to avoid linting problems (“no-changed-when # Commands should not change things if nothing needs doing.”).
Running “molecule converge” now succeeds (note the “prepare” step):
1
2
3
4
5
6
7
8
9
10
11
12
13
14
15
16
17
18
19
20
21
22
23
24
25
26
27
28
29
30
31
32
33
34
35
> MOLECULE_DISTRO=ubuntu:jammy molecule converge
...
INFO Running default > create
WARNING Skipping, instances already created.
INFO Running default > prepare
INFO Sanity checks: 'docker'
PLAY [Prepare] *****************************************************************
TASK [Install python in Ubuntu] ************************************************
changed: [instance]
PLAY RECAP *********************************************************************
But it doesn’t. That’s because the “pipefail” we added to make lint happy works in bash but not in sh, which is used by default in Ubuntu (in Fedora, it was bash). It’s just a matter of adjusting that verification’s task accordingly:
YAML
1
2
3
4
5
6
7
...
- name: Get current user's shell
...
register: user_shell
args:
executable: /bin/bash
changed_when: false
And now verification succeeds in Ubuntu as well.
If you run this against Fedora (remember that you must destroy the Ubuntu instance first), the task “Install python in Ubuntu” will be skipped.
Note that if you run
Let’s try to converge with the Ubuntu Docker image…
1
MOLECULE_DISTRO=ubuntu:jammy molecule converge
and then execute
1
molecule login
Molecule will reuse the image just created: it does not recreate the Docker image even if you haven’t specified any environment variable. This means that, as mentioned above, if you want to test with another value of the environment variable (including the default case), you first have to destroy the current image. By defining several scenarios, as we will see in a minute, there’s no such limitation.
Add a GitHub Actions build matrix
Let’s modify the GitHub Actions workflow to test our role with Fedora and Ubuntu in two jobs using a build matrix. These are the relevant parts to change to use the environment variable MOLECULE_DISTRO that we introduced in the previous section:
YAML
1
2
3
4
5
6
7
8
9
10
11
12
13
14
15
16
17
...
test:
name: Molecule
runs-on: ubuntu-latest
strategy:
fail-fast: false
matrix:
playbookdistro:
- fedora:36
- ubuntu:jammy
...
- name: Run Molecule tests.
run: molecule test
env:
PY_COLORS: '1'
ANSIBLE_FORCE_COLOR: '1'
MOLECULE_DISTRO: ${{matrix.playbookdistro}}
Now GitHub Actions will execute two jobs for each pushed commit:
Using different scenarios
We now see a different technique to test with different Linux distributions. Instead of using an environment variable to parameterize Molecule, we create another Molecule scenario. To do that, it’s enough to create another subdirectory inside the “molecule” directory. We’ll use the “Ubuntu” example to see this technique in action. (Before doing that, remember to run “molecule destroy” first).
First, let’s undo the modification we did in the file “molecule.yml”:
YAML
1
2
3
4
platforms:
- name: instance
image: fedora:36
pre_build_image: true
And let’s create another subdirectory, say “ubuntu”, inside “molecule”, where we create this “molecule.yml” file (it’s basically the same as the one inside “default” where we specify “ubuntu:jammy” and a different name for the “image”):
YAML
1
2
3
4
5
6
7
8
9
10
11
12
13
14
15
16
17
---
dependency:
name: galaxy
driver:
name: docker
lint: |
set-e
yamllint.
ansible-lint
platforms:
- name: instance-ubuntu
image: ubuntu:jammy
pre_build_image: true
provisioner:
name: ansible
verifier:
name: ansible
Let’s copy the “default/verify.yml” and “default/converge.yml” into this new directory, and let’s move the “default/prepare.yml” into this new directory, where we change the contents as follows (that is, we get rid of the “when” condition since this will be used only in this new scenario):
YAML
1
2
3
4
5
6
7
8
9
10
---
- name: Prepare
hosts: all
gather_facts: false
tasks:
- name: Install python in Ubuntu
ansible.builtin.raw: >
aptupdate&&\
aptinstall-y--no-install-recommendspython3sudo
changed_when: false
To summarize, this should be the layout of the “molecule” directory (we’ll get rid of duplicated contents in a minute):
1
2
3
4
5
6
7
8
9
10
molecule
├── default
│ ├── converge.yml
│ ├── molecule.yml
│ └── verify.yml
└── ubuntu
├── converge.yml
├── molecule.yml
├── prepare.yml
└── verify.yml
Now, running any molecule command will use the “default” scenario. If we want to execute molecule commands against the “ubuntu” scenario, we must use the argument “-s ubuntu” (where “-s” is the short form of the command line argument “–scenario-name”).
For example
1
2
3
4
5
6
7
8
# converge using Fedora
molecule converge
# converge using Ubuntu
molecule converge-subuntu
# enter the Fedora instance created with the first command
molecule login
# enter the Ubuntu instance created with the second command
molecule login-subuntu
So we can converge, verify, and experiment with the two scenarios without destroying a previously created instance.
Of course, we adapt the GitHub Actions workflow accordingly to use scenarios instead of environment variables:
Let’s move the shared files “verify.yml” and “converge.yml” to a new subdirectory, say “shared”. So the layout should be as follows:
1
2
3
4
5
6
7
8
9
molecule
├──default
│└──molecule.yml
├──shared
│├──converge.yml
│└──verify.yml
└──ubuntu
├──molecule.yml
└──prepare.yml
The last part of both “molecule.yml” files in “default” and “ubuntu” must be changed to refer to files in another directory (note that the “verifier” part has been removed since it’s specified in the “provisioner” part):
YAML
1
2
3
4
5
6
...
provisioner:
name: ansible
playbooks:
converge: ../shared/converge.yml
verify: ../shared/verify.yml
Now we reused the common files between the two scenarios. Of course, we verify that everything still works in both scenarios.
Testing with Arch, a custom Dockerfile
Let’s now test this simple role also with Arch Linux. The idea is to create another scenario, e.g., another subdirectory, say “arch”. We could follow the same technique that we used for Ubuntu because also the Arch Docker image has to be “prepared” with “python” and “sudo”. However, to try something different, let’s rely on a custom Docker image specified with a Dockerfile.
The “molecule.yml” in the “arch” directory is as follows:
YAML
1
2
3
4
5
6
7
8
9
10
11
12
13
14
15
16
17
18
19
20
---
dependency:
name: galaxy
driver:
name: docker
lint: |
set-e
yamllint.
ansible-lint
platforms:
- name: instance-arch
image: arch-ansible
platform: linux/amd64
dockerfile: ./Dockerfile
build_image: true
provisioner:
name: ansible
playbooks:
converge: ../shared/converge.yml
verify: ../shared/verify.yml
NOTE: the specification “platform: linux/amd64” is not required because we use a custom Dockerfile. It is required if you want to test this scenario on a Mac m1 (by the way, see my other blog post about Docker on a Mac m1): while Ubuntu and Fedora also provide Docker images for the aarch64 (arm) architecture, Arch Linux does not. So we must force the use of the Intel platform on Arm architectures (of course, on Mac m1, the Docker container will be emulated).
And in the same directory, we create the Dockerfile for our Arch Docker image:
1
2
3
4
5
6
FROM archlinux:latest
LABEL maintainer="Lorenzo Bettini"
RUN pacman -Sy --noconfirm --needed python sudo
CMD ["/bin/sh"]
For this example, the Docker image for Arch is simple because we only need “python” and “sudo” to test our role.
Now the directory layout should be as follows:
1
2
3
4
5
6
7
8
9
10
11
12
molecule
├── arch
│ ├── Dockerfile
│ └── molecule.yml
├── default
│ └── molecule.yml
├── shared
│ ├── converge.yml
│ └── verify.yml
└── ubuntu
├── molecule.yml
└── prepare.yml
Now, when Molecule creates the instance, it will use our custom Dockerfile.
We verify that the “arch” scenario also works and update the GitHub Actions workflow by adding “arch” to the scenario matrix.
I hope you find this post helpful in getting started with Ansible and Molecule.
As I wrote in this other article, I recently bought an Acer Aspire Vero, which I greatly enjoy. Of course, I immediately installed Linux on this machine. In this article, I’ll report my experience installing Ubuntu (Ubuntu 22.10 “Kinetic Kudu”) on this Acer Aspire Vero.
Although nowadays I’m mainly an Arch Linux user, when installing Linux on a brand new laptop, I typically prefer to start with Ubuntu.
Preparation
I have already downloaded the Ubuntu ISO and copied it into a USB stick with Ventoy.
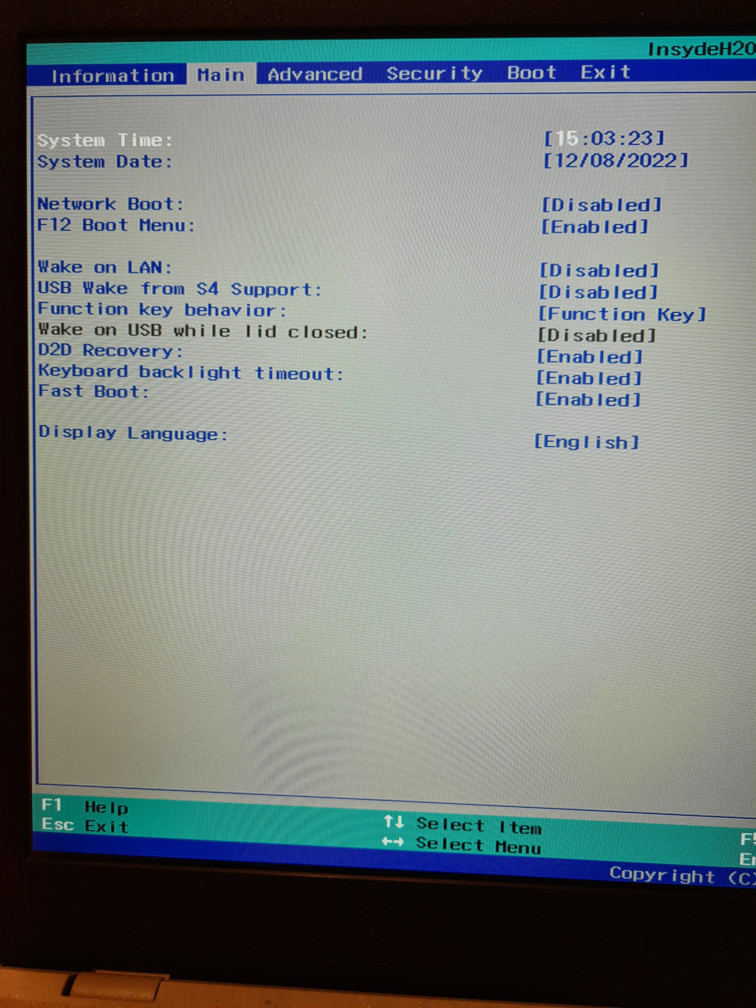
I need the F12 boot menu to boot from the USB stick. This is also useful later because I typically have several Linux distributions installed on the same computer. To enter the BIOS, you must press F2 while the laptop is booting (when you see the “Acer” logo). Make sure the “F12 Boot Menu” is enabled (by default, it’s disabled):
I also disabled “Secure Boot”. If you go to the BIOS “boot” tab, you see that you cannot change the boot entries.
This will allow you to change the entry of “Secure Boot”:
Then, you can disable the Supervisor Password (you have to use the password you had previously chosen).
Then, it’s time to prepare some room in the SSD for Linux. I do that by shrinking the Windows partition from Windows itself. After installing a few programs on Windows (and performing the system updates), that’s the amount of used space:
I opened “Disk Management”, selected the primary partition, and used the context menu “Shrink Volume…”; since I’m not planning to use Windows much, 137Gb should be enough for the Windows partition after shrink:
And that’s the result:
Before installing Linux, I also disabled “fast startup” in Windows: this will allow me later to access the Windows partition from Linux (otherwise, the Windows partition would be in an inconsistent state):
OK, let’s reboot with the USB stick (I’m using Ventoy) and press F12 to get to the boot menu to choose to boot from the USB:
Ubuntu boots fine.
I decided first to try Ubuntu and see whether everything works in the live environment:
The sound works. I’d say that WiFi and Bluetooth are also working from the new GNOME 43 menu in the top-right corner (in fact, I can connect to my WiFi). Moreover, the “Balanced” profile is automatically selected, meaning power profiles also work.
Installation
The overall installation process went smoothly and fast.
I prefer to manually partition the disk because I want a swap partition (for hibernation), a standard EXT4 partition mounted on a directory that I will share with other Linux installations, and the root partition as BTRFS.
The installed system
So here we are on the installed system; as usual, I’m greeted by the initial setup dialog:
Wayland works and touchpad gestures work as well.
Grub detected my existing Windows installation so that I could boot Windows from the grub menu.
Usually, I have to increase the font size on my computers. This laptop provides 1920×1080 (16:9) on a 15,6 screen. Typically, I have to use Gnome Tweaks, but in this case, using the “Accessibility” menu and selecting “Large Text” was enough for having a readable screen (this corresponds to a font scaling factor of 1.25):
Power consumption
I selected “Power Saver” as the power profile in the Gnome menu, and I have installed “powertop”. I ran “sudo powertop –auto-tune,” and then I ran “sudo powertop” to see the power consumption without further interacting with the computer:
If I decrease the brightness a bit, it looks even better:
Since 9 hours is the declared time in the computer spec, I’d say Linux works great on this computer in this respect (even better than Windows).
See also later in this article another mechanism to improve power consumption.
Other configurations
I had to perform some additional tweaks, which I had already blogged about:
I have always liked Amarok, the (initially) default KDE media player. It’s very feature-rich, nothing compared to Elisa. Moreover, it has two crucial features that I haven’t found in any other players:
it saves statistics (play count and stars) directly into the music file
it synchronizes statistics with iPod
Unfortunately, while still maintained, you won’t find pre-built packages in mainstream distributions (e.g., Ubuntu). Thus, you must install that from sources, which is problematic. However, for Arch Linux, there’s an AUR package, which takes care of the compilation and, most of all, its dependencies.
In this blog post, I’ll summarize the steps for installing Amarok to access iPods (I still have an iPod classic).
First, you need to install the Phonon backend required by Amarok:
1
sudo pacman -S phonon-qt5-vlc
If you want to use Amarok with an iPod, you must first install
1
yay -S amarok
IMPORTANT: the iPod library (this must be present when Amarok is compiled from sources; if you forget about that, you’ll need to recompile Amarok, e.g., by specifying “–rebuild” as a command line argument to the AUR helper):
1
sudo pacman -S libgpod
Then, we’re ready to install (i.e., compile from sources) Amarok from the AUR repository (I’m using the “yay” AUR helper here, but if you use another one, use your preferred one):
1
yay -S amarok
Now be patient: it will take several minutes for the compilation to finish (about 20 minutes on a decent machine)!
If you’re on KDE, you can now enjoy Amarok.
If you’re on GNOME, there’s still something to fix. In particular, you’ll see Amarok lacks lots of icons:
You need to install Breeze icons:
1
sudo pacman -S breeze-icons
And now you can also enjoy icons:
Concerning the iPod: first, you have to mount it, and then you start Amarok so that Amarok can see the mounted iPod.
Although I’m a Linux user, I also recently bought a Mac Air M1, and I wanted to use Docker (a big part of my TDD book) to ensure that my projects based on Docker work on m1 as well.
Run “mvn docker:start” to start a MySql container with a random mapped port. The command will wait for the container to be ready (it looks for a “ready” string within 20 seconds). After the command succeeds, the container will be running in the background. Run “mvn docker:stop” to stop the started container.
To avoid errors in this shape:
1
2
[ERROR] : could not get native definition for type `POINTER`, original error message follows: java.lang.UnsatisfiedLinkError: Unable to execute or load jffi binary stub from `/var/folders/5c/90l1wfls2xl7_xvqxqvnm3jw0000gn/T/`. Set `TMPDIR` or Java property `java.io.tmpdir` to a read/write path that is not mounted "noexec".
Actually, the first time I tried this project, it did not work (not because of the above error), but after a recent update, it started to work, maybe because of this added link:
Note that not all the images are available for this architecture “aarch64”. For example, if you try to use this older version of “mysql”, you get this error:
1
2
3
docker pull mysql:5.7
5.7: Pulling from library/mysql
no matching manifest for linux/arm64/v8 in the manifest list entries
[WARNING]DOCKER>The requested image'splatform(linux/amd64)does notmatch the detected host platform(linux/arm64/v8)andno specific platform was requested
If you now enter the container, you can verify that you’re running an x86_64 image:
1
2
3
sh-4.2# uname -a
Linux cf9d5b28744a 5.15.49-linuxkit #1 SMP PREEMPT Tue Sep 13 07:51:32 UTC 2022 x86_64 x86_64 x86_64 GNU/Linux
sh-4.2#
However, such images will run slower because they are emulated:
Testcontainers
I also use Testcontainers to start Docker containers from the JUnit tests in my projects.
After using EndeavourOS, an Arch-based distro, for some time with much pleasure and appreciating Arch mechanisms (packages and AUR), I decided it was time to try the “real thing” and install Arch the “hard way” 🙂 Spoiler: it’s not that hard!
I thought it was hard. For sure, it’s more complicated than other distro installation procedures, but, to be honest, after using Linux for more than 20 years, I thought there was not much to be scared of 😉
I now use Arch (besides other distros) on my machines greatly. Of course, I did many experiments with virtual machines before installing Arch on bare metal. I know there are many guides and tutorials, but I’d like to summarize my steps for installing Arch (with a SWAP partition, an EXT4 partition for data to be shared among distros, and a BTRFS primary partition). In particular, in this blog post, I’ll describe my steps for installing Arch on a virtual machine, which, as I’ve just said, it’s the best way to get confident with Arch and not be scared of installing Arch on a real computer. Moreover, on many guides, I noticed a few missing points, which, instead, are essential.
Of course, the best reference is the excellent official guide, and I’ll use the official guide as a reference while following along, https://wiki.archlinux.org/title/installation_guide. Note that there are still a few parts in the guide that refer to other parts of the excellent Arch wiki, and I had a few minor problems the first time I tried the Arch installation.
Here we go!
Create and configure the virtual machine with enough disk space (dynamically allocated so you won’t waste space on your disk), let’s say 100Gb. Make sure you enable EFI in the virtual machine configuration. Of course, insert the Arch Linux ISO as a live CD in the virtual machine. I’m going to use archlinux-2022.09.03-x86_64.iso.
As described in a previous post, I’d suggest performing the installation by connecting via SSH to the virtual machine. This way, you’re using a local terminal: copy and paste will work (since you’re on a local terminal). In particular, since the Arch installer is textual, being able to copy and paste commands from a local terminal makes everything easier. Moreover, the keyboard layout will be the host system’s keyboard layout. Thus, the keyboard layout will be already configured correctly. While in the virtual machine, you’d have to configure the keyboard layout.
(On a side note, even when installing Arch on a real computer, I prefer doing that via SSH, of course, from another computer.)
Before starting the virtual machine, we must map the SSH port of the virtual machine to a local port to connect from our computer. This requires knowing the name you gave to your virtual machine. In this example, I called the virtual machine “Arch Gnome” (because I’ll then install Gnome on the Arch installation). We must run these instructions from the host computer:
Port 2522 is the one we’ll have to use later for connecting to the virtual machine via localhost. Of course, feel free to use another free port number as long as you’ll use it consistently from now on.
Start the virtual machine:
Inside the live environment, the SSH server is already up and running. However, since we’ll connect with the root account (the only one present), we must give the root account a password. By default, it’s empty, and SSH will not allow you to log in with a blank password. Choose a password. This password is temporary, and if you’re in a trusted local network, you can choose an easy one.
Now, we can connect via SSH to the virtual machine through localhost. if you have already connected via SSH to localhost, you might get an error of the shape:
IT IS POSSIBLE THAT SOMEONE IS DOING SOMETHING NASTY!
Someone could be eavesdropping on you right now (man-in-the-middle attack)!
It is also possible that a host key has just been changed.
The fingerprint for the ED25519 key sent by the remote host is
SHA256: ...
Please contact your system administrator.
Add correct host key in <YOUR HOME>/.ssh/known_hosts to get rid of this message.
Offending ECDSA key in <YOUR HOME>/.ssh/known_hosts:<A LINE NUMBER>
Host key for [127.0.0.1]:2522 has changed and you have requested strict checking.
Host key verification failed.
All you have to do is edit the known_hosts file by removing the offending lines and try again. You will have to remove all the lines that start with “[127.0.0.1]:2522”.
Note that we’re using port 2522 because we previously used that for creating the port mapping. Let’s connect to the virtual machine and type the password we have previously specified for the root account inside the virtual machine (Accept the fingerprint when asked.):
1
ssh-p2522root@127.0.0.1
In your local terminal, you see that you get the colors of the virtual machine (now, you’re inside the virtual machine):
Let’s set the console keyboard layout (the default layout is US; if that’s fine with you, skip the next step). This step is not strictly required for our local terminal: even if we’re inside the virtual machine, we’re using our local terminal, so we already use the correct layout. However, let’s do that anyway since we want to simulate an actual installation. Moreover, having the proper layout is good if we want to run commands directly from the VirtualBox window.
I already know the layout I want for my Italian keyboard, so I run:
1
loadkeys it
If you don’t know the exact layout, you can list the available ones with
1
ls/usr/share/kbd/keymaps/**/*.map.gz
You can verify in the VirtualBox window that the layout is applied correctly.
Since we are in a virtual machine, the machine should already be able to access the Internet if your host is correctly connected (and that’s required to install Arch Linux). However, if you want to simulate what you would do with an actual installation on bare metal, you can ping a remote host and verify that everything’s OK:
1
ping archlinux.org
Before going on, as suggested in the official guide, it’s better to make sure the system clock is accurate by enabling network synchronization NTP:
1
timedatectl set-ntp true
Partitioning the disk
How to partition the disk is your choice. In this example, I will partition the disk according to my needs. However, you need at least two partitions: one for booting in UEFI mode and one for the root filesystem.
In this example, I’ll create four partitions:
the one for booting in UEFI mode, formatted as FAT32, 300Mb (it should be enough for UEFI, but if unsure, go on with 512Mb)
a swap partition, 20Gb (I have 16Gb, and if I want to enable hibernation, i.e., suspend to disk, that should be enough)
a partition meant to host common data that I want to share among several Linux installations on the same machine (maybe I’ll blog about that in the future), formatted as EXT4, 30Gb
the root partition, formatted as BTRFS, the rest of the disk
To do that, I’m using cfdisk, a textual partition manager, which I find easy to use.
Now, it is time to get to know the device name of our disk using the command lsblk:
1
2
3
4
5
root@archiso ~ # lsblk
NAME MAJ:MIN RM SIZE RO TYPE MOUNTPOINTS
loop0 7:0 0 683.2M 1 loop /run/archiso/airootfs
sda 8:0 0 100G 0 disk
sr0 11:0 1 794.3M 0 rom /run/archiso/bootmnt
As you might guess, sda is the disk we are installing Arch Linux upon. In a virtual machine, that’s probably always like that. On a real machine, it might be different (for example, if you have an NVME SSD, it will be something like nvme0n1). It’s needless to say that using the correct device name is crucial, especially on a real machine, or you might end up wiping away essential data. The nice thing about a virtual machine is that you’re in a “sandbox,” so, at worst, you’ll break your virtual machine.
So I run
1
cfdisk/dev/sda
If it is a new virtual machine, you’ll be asked a partition table: choose gpt.
Start creating your partitions. Just use the menus of cfdisk; it’s easy (on the bottom, you will find some help). Once you create a partition, set the “Type” correctly. By default, the type is “Linux filesystem”. For UEFI, you have to specify the type “EFI System,” and for the swap partition, “Linux swap”.
That’s my final result:
Let’s “Write” the partition table to disk and “Quit”. We can also verify with lsblk that the result is as expected:
1
2
3
4
5
6
7
8
9
root@archiso ~ # lsblk
NAME MAJ:MIN RM SIZE RO TYPE MOUNTPOINTS
loop0 7:0 0 683.2M 1 loop /run/archiso/airootfs
sda 8:0 0 100G 0 disk
├─sda1 8:1 0 300M 0 part
├─sda2 8:2 0 20G 0 part
├─sda3 8:3 0 30G 0 part
└─sda4 8:4 0 49.7G 0 part
sr0 11:0 1 794.3M 0 rom /run/archiso/bootmnt
Of course, you must know which partition is meant for what. In my example, sda1 is for UEFI, sda2 for swap, sda3 for my shared data, and sda4 for root.
Format the partitions
According to my intended layout shown above, I’ll format the four partitions with the following commands:
1
2
3
4
mkfs.fat-F32/dev/sda1
mkswap/dev/sda2
mkfs.ext4/dev/sda3
mkfs.btrfs/dev/sda4
Mount the partitions
This is also delicate, so you must use the correct device names. What follows is, of course, correct according to my layout.
First of all, let’s deal with the swap partition:
1
swapon/dev/sda2
The presence of the BTRFS file system for the root partition makes things a bit more interesting (or a bit more complicated, as you prefer 😉
First, we must mount the BTRFS filesystem on /mnt. Note that we are mounting the BTRFS on /mnt only temporarily and to create the subvolumes (in a minute, we will mount the subvolumes in their final shape on /mnt, together with the other partitions):
1
mount/dev/sda4/mnt
This will allow us to create the subvolumes. Again, what follows is the BTRFS subvolume layout I prefer. You might want to choose a different one. To use Timeshift, you must have at least @ for / and @home for /home. This is how I create the subvolumes I want:
1
2
3
4
5
6
btrfs su cr/mnt/@
btrfs su cr/mnt/@home
btrfs su cr/mnt/@cache
btrfs su cr/mnt/@log
btrfs su cr/mnt/@machines
btrfs su cr/mnt/@portables
As I said, this mount was temporary, just for creating subvolumes. In fact, we now unmount /mnt:
1
umount/mnt
And we mount every single subvolume in its final “position” inside /mnt by also specifying a few additional options like the general “noatime” and the BTRFS-specific “compress” to enable the ztsd compression:
The “-m” option makes mount create the target directory if it does not exist.
Finally, we can mount the remaining partitions. The UEFI one should be mounted to “/boot/efi” inside “/mnt”. I like to mount the “common” partition in “/media/bettini/common” inside “/mnt” because that’s where I’ll use it (relying on the fact that I’ll create a user “bettini” for myself). Again, choose something else for yourself. These are the commands:
This is the final layout of /mnt, which, remember, is where our system will be installed:
1
2
3
4
5
6
7
8
9
10
11
12
13
14
/mnt
├── boot
│ └── efi
├── home
├── media
│ └── bettini
│ └── common
│ └── lost+found
└── var
├── cache
├── lib
│ ├── machines
│ └── portables
└── log
Select the mirrors
This part, documented in the official installation guide, is usually skipped in several blog posts I found online. Instead, this step is essential.
The mirrors are specified in the file /etc/pacman.d/mirrorlist.
The guide says:
On the live system, after connecting to the internet, reflector updates the mirror list by choosing 20 most recently synchronized HTTPS mirrors and sorting them by download rate.
The higher a mirror is placed in the list, the more priority it is given when downloading a package. You may want to inspect the file to see if it is satisfactory. If it is not, edit the file accordingly, and move the geographically closest mirrors to the top of the list, although other criteria should be taken into account
You can verify that by inspecting the file /etc/pacman.d/mirrorlist. In my case, the Italian mirror is the last one, so it will be given the lowest priority. This sounds wrong to me. In particular, the documentation also points out:
This file will later be copied to the new system by pacstrap, so it is worth getting right.
Thus, I prefer to run the program reflector myself (see the reflector documentation for the single arguments; of course, I’m using “Italy” as the country because that’s where I leave; I could also specify several values separated by a comma, e.g., “Italy,Germany”):
1
2
3
4
5
6
7
8
reflector \
--country Italy \
--age 12 \
--protocol https \
--fastest 5 \
--latest 20 \
--sort rate \
--save /etc/pacman.d/mirrorlist
The following step does not seem to be required in the installation guide. However, to make sure we have an updated PGP keyring (for checking signatures of packages), at this point, I also run:
1
pacman-Sy--noconfirm archlinux-keyring
Running pacstrap
Now, it’s time to install the base packages, Linux kernel, and firmware for standard hardware using the pacstrap script. You specify the target directory, which, as you might guess, it’s /mnt, and the packages.
This is the command I run (I prefer to use the LTS kernel; if you want the latest kernel, use “linux” package instead of “linux-lts”; you can also install them both and then select one from the grub menu):
1
2
3
4
5
pacstrap /mnt base linux-lts linux-firmware \
nano vim \
intel-ucode \
btrfs-progs \
sof-firmware alsa-firmware
This command will download about 500Mb, which might take time depending on your Internet speed.
Configuring the system
Since we have already manually mounted all our partitions (on /mnt), the Arch ISO can generate for us the file fstab automatically through the command genfstab:
1
genfstab -U /mnt >> /mnt/etc/fstab
The “-U” option tells genfstab to use UUID to refer to partitions (alternatively, “-L” can be used to use labels instead).
You can have a look at the result (of course, UUID will be different in your case):
Note that although we used the option “compress=zstd” when mounting our BTRFS subvolumes, genfstab turned that into “compress=zstd:3” because “3” is the default compression value for zstd in BTRFS. If we wanted to make the compression value explicit, e.g., “1”, we should have done that when mounting the subvolumes. Of course, you can always tweak the generate fstab as you see fit.
Now, we can “enter” our installation with “chroot” or, better, with the enhanced arch-chroot, which automatically binds other things like /dev and /proc:
1
arch-chroot/mnt
The root directory is what’s inside /mnt, so / refers to what’s inside /mnt. Also, the prompt has changed to reflect this:
1
2
root@archiso ~ # arch-chroot /mnt
[root@archiso /]#
We now set the timezone of the installed system. You must use Region/City according to your location. Timezones are available in the directory /usr/share/zoneinfo/. In my case (Italy), I run:
Then, we use hwclock to set the Hardware Clock from the System Clock:
1
hwclock--systohc
Then, we edit /etc/locale.gen and uncomment the locales we need; in my case, en_US.UTF-8 UTF-8 and it_IT.UTF-8. Since I already know the two locales, instead of editing the file (where all locales are commented out), I append the two locales to the end of that file:
1
2
echo en_US.UTF-8 UTF-8 >> /etc/locale.gen
echo it_IT.UTF-8 UTF-8 >> /etc/locale.gen
And we generate the locales:
1
locale-gen
We must also create the /etc/locale.conf file, and set the LANG variable accordingly. This can be done as follows:
1
echo LANG=en_US.UTF-8 >> /etc/locale.conf
We also make permanent the initial changes to the console layout (remember, I used “it”; in your case, you need to use the code you previously specified):
1
echo KEYMAP=it >> /etc/vconsole.conf
We’ll deal with the network configuration (of the installed system) in a minute. But we can already create the files /etc/hostname and /etc/hosts. You have to choose your preferred hostname. In this example, I’m going to use “arch-vm-gnome”. So I generate the two files with the following two commands:
1
2
3
4
5
6
7
echo arch-vm-gnome >> /etc/hostname
cat >> /etc/hosts << EOF
127.0.0.1 localhost
::1 localhost
127.0.1.1 myhostname.localdomain arch-vm-gnome
EOF
The boot loader
Since we use BTRFS, we might want to tweak the file /etc/mkinitcpio.conf with these two modules:
1
MODULES=(crc32c-intel btrfs)
And regenerate the initramfs images:
1
mkinitcpio-P
Let’s now install the bootloader. I prefer GRUB. So let’s install a few packages:
1
pacman -S --noconfirm --needed grub efibootmgr
During the installation, you might want to take note of the recommendation for installing and configuring grub and the optional dependencies:
1
2
3
4
5
6
7
8
9
10
11
12
13
:: Install your bootloader and generate configuration with:
$ grub-install ...
$ grub-mkconfig -o /boot/grub/grub.cfg
Optional dependencies for grub
freetype2: For grub-mkfont usage
fuse2: For grub-mount usage
dosfstools: For grub-mkrescue FAT FS and EFI support
lzop: For grub-mkrescue LZO support
efibootmgr: For grub-install EFI support [pending]
libisoburn: Provides xorriso for generating grub rescue iso using
grub-mkrescue
os-prober: To detect other OSes when generating grub.cfg in BIOS systems
mtools: For grub-mkrescue FAT FS support
Now we install grub in the UEFI partition. Note that, unlike standard GUI Linux installations, you can specify the “–bootloader-id”, which will be the identifier of this grub installation in UEFI. This is useful if you have several bootloaders on your machine. In this example, I’m using ArchGnome:
Found initrd image: /boot/intel-ucode.img /boot/initramfs-linux-lts.img
Found fallback initrd image(s) in /boot: intel-ucode.img initramfs-linux-lts-fallback.img
Warning: os-prober will not be executed to detect other bootable partitions.
Systems on them will not be added to the GRUB boot configuration.
Check GRUB_DISABLE_OS_PROBER documentation entry.
Adding boot menu entry for UEFI Firmware Settings ...
done
User accounts
Don’t forget to set the following passwords, or you will not be able to log in to the installed system once you reboot later.
We can now set the root password. This is the effective password for root in the installed system. This should be chosen carefully:
1
passwd
I prefer to use “sudo”, so I first install that
1
pacman-Ssudo
This is also the moment to create your own user account; in my case, it is “bettini”.
1
2
3
useradd-mbettini
usermod-aG wheel,sys,rfkill bettini
I add the user to a few essential groups, in particular, “wheel” which makes my user a superuser account. Just relying on the group “wheel” is not enough: we must allow members of the group wheel to execute any command. This is done by uncommenting this line in the /etc/sudoers: “%wheel ALL=(ALL:ALL) ALL”. A sed command will accomplish that:
That would be enough to reboot and try our installation. However, we would have no networking (actually, since this is a virtual machine, networking should work out of the box since you don’t need to configure any WiFi network, for example) and no desktop environment. So let’s go on with some further installations and configurations:
Install Gnome
In this example, I’m going to install the GNOME desktop environment. Besides GNOME, I’m installing other necessary packages like the “NetworkManager” (for easily configuring networking in GNOME), “firewall”, “firefox”, the package for choosing a power profile (useful for laptops), and other base packages, including the kernel headers (here I’m using “linux-lts-headers” because I installed the LTS kernel; otherwise, use “linux-headers”):
I have already blogged about EndeavourOS, which I use most of the time on all my computers (desktops and laptops). Since EndeavourOS, based on Arch, is a rolling release, I update it almost daily and don’t need to install it from scratch when a new release comes out, like Cassini, released a few days ago. However, I wanted to try this new release by installing it from scratch (of course, using BTRFS).
I’ll first go through the installation, but I can anticipate that, once again, I’m impressed by EndeavourOS. This installation is smooth, with some novelties: you can choose between “grub” and “systemd-boot” now. Moreover, they switched from “mkinitcpio” to “dracut” for the generation of initramfs (this requires a few adjustments if you want to enable hibernation). Most of all, EndeavourOS is pure Arch but with outstanding defaults. Indeed, the KDE and GNOME environments are vanilla ones, with only a few customizations.
This time, I’ll install GNOME (but I’ll briefly say something about the KDE version at the end of this article).
Installation
First, I’m using Ventoy to boot the installer because I keep several Linux ISOs on the USB stick. I first made sure to update Ventoy because I read that the old versions did not work correctly with the latest Arch-based ISOs. Moreover, once I selected the “Cassini” ISO:
I got another menu (that’s something new), where I selected GRUB:
As usual, the first thing to do, once booted into the live environment, XFCE, is set up the network connection. You might also want to change the keyboard layout (Disable system defaults and install your layout, in my case, it’s the Italian layout):
Then, let’s update the mirrors (typically by selecting your state and possibly another one near you) with the “Welcome” application:
Then, let’s start the installer.
I choose the “Online” method because I want to install GNOME instead of Xfce.
I always prefer to install any operating systems in English, so I select “American English”:
The location has been found successfully, and while the language is the one I chose, it proposes to use my Italian locale for dates and numbers:
After setting the keyboard layout, I select the GNOME desktop:
And then, I can select the single packages. Since you choose the packages after selecting the desktop, a few packages, in particular, the ones of the chosen desktop, have already been selected:
Then, I typically unselect “xf86-video-intel”, which is known to give a few problems:
And I select all the packages concerning “Printing Support” (including “HP”) and also the “LTS kernel in addition” (because if anything goes wrong with the latest kernel, I can switch to the LTS one).
Now there’s a big novelty: you can select the bootloader. The default is “systemd-boot”, but I prefer to stay with GRUB (since I know it works for my use cases like booting Timeshift snapshots and booting other distros):
It’s time for partitioning. Since I have another (EndeavourOS) Linux installation and Windows on this computer, I choose Manual partitioning:
First, I specify to mount the existing EFI partition (into “/boot/efi”) without formatting it and ensure the “boot” flag is selected. This way, the installer can properly install GRUB.
Then, I select the (existing) partition I’m going to replace with this installation; I specify to format it as BTRFS and mount it as the root partition:
There’s also an existing EXT4 partition that I use to share common data among my Linux installations, so I select that (without formatting it) and specify my desired mount point:
That’s the final layout of the primary SSD disk:
I also have another HD on this computer with some existing partitions I want to access from the installed system. So I select this other disk from the top drop-down list, and I specify the final mount points:
As usual, there’s the “Users” section, which I will not detail.
Finally, we can have a look at the summary, which looks good to me:
OK, let’s start the installation!
The installation went fine, and it took about 5 minutes. This is an old computer (6 years old), so it was pretty fast.
First impressions
Here we are in the installed system!
As usual, the GRUB menu is beautifully pink and purple:
And here’s GNOME:
You see that these are not the standard GNOME icons. In fact, EndeavourOS provides GNOME with the “Qogir” icons, which look great to me:
Besides that, I seem to understand that’s vanilla GNOME (it does not have “minimize” and “maximize” buttons enabled by default). It’s good that “GNOME Tweaks” is already installed. However, there’s no GNOME extension installed (the first one I installed was “AppIndicator and KStatusNotifierItem Support”). The terminal is the new “GNOME Console”, which I’ll soon replace with the old “GNOME Terminal” (I prefer that one). Standard GNOME applications like “Calendar” and “Contacts” are not installed either. At least, we have the new GNOME Text editor, which replaces the (IMHO) unusable “Gedit”.
There are no standard GNOME wallpapers, just the EndeavourOS one. Of course, you can install other wallpapers using the “Welcome” app. However, I’ll switch to Variety soon.
The Wayland session is enabled by default. It’s OK to me because GNOME and Wayland are usable nowadays.
The BTRFS subvolumes were created as expected, that is, with a separate “@home” and separate subvolumes for “/var/log” and “/var/cache”. Unfortunately, we also have nested subvolumes for “/var/lib/machines” and “portables”, which are known to give headaches if you restore a Timeshift snapshot:
1
2
3
4
5
6
ID 256 gen 137 top level 5 path @
ID 257 gen 137 top level 5 path @home
ID 258 gen 100 top level 5 path @cache
ID 259 gen 137 top level 5 path @log
ID 260 gen 27 top level 256 path var/lib/portables
ID 261 gen 28 top level 256 path var/lib/machines
Thus, since I’m not planning to use them, I removed them (this will make the two nested subvolumes disappear), and I recreated them as standard directories (I seem to understand that those two directories must exist; otherwise systemd will recreate them anyway):
1
2
3
4
5
6
7
8
9
10
11
12
13
14
15
16
17
$ sudo rmdir /var/lib/portables
$ sudo rmdir /var/lib/machines
$ sudo btrfs su li /
ID 256 gen 167 top level 5 path @
ID 257 gen 167 top level 5 path @home
ID 258 gen 100 top level 5 path @cache
ID 259 gen 167 top level 5 path @log
$ sudo mkdir /var/lib/portables
$ sudo mkdir /var/lib/machines
$ sudo btrfs su li /
ID 256 gen 167 top level 5 path @
ID 257 gen 167 top level 5 path @home
ID 258 gen 100 top level 5 path @cache
ID 259 gen 167 top level 5 path @log
So it’s time to start installing my applications and tweak a few GNOME settings.
In particular, since I have both the “linux” and “linux-lts” kernel, the GRUB configuration sets the LTS version as the default. To change that, I edit “/etc/default/grub” and specify
1
GRUB_TOP_LEVEL="/boot/vmlinuz-linux"
And regenerate the GRUB configuration:
1
sudo grub-mkconfig-o/boot/grub/grub.cfg
Concerning KDE
I have also tried EndeavourOS KDE on a virtual machine. With Cassini, you get a new custom (and beautiful) Plasma theme, dark and purple (as usual in EndeavourOS).
To summarize
To summarize, EndeavourOS once again proved to be a fantastic Arch-based Linux distribution:
Easy to install
Arch-based (e.g., not like Manjaro)
not bloated with too much software
close to the vanilla DEs (at least for the ones I tried, GNOME and KDE)
Now, a few things must be adapted to make hibernation work in EndeavourOS, and the automatic tool described in my previous post can no longer be used. However, don’t worry; it’s not hard to enable hibernation. In this post, I’ll describe the steps to enable it.
IMPORTANT: my instructions assume that you have a SWAP partition; for a SWAP file, you’ll have to adapt a few things, but I can’t help since I never use SWAP files.
First, you need to have a swap partition already set up. For example, in /etc/fstab, you should have something like
Shell
1
2
# swap was on /dev/<your swap partition> during installation
UUID=<the UUID of your swap partition>none swap sw00
The UUID is essential, and you should take note of it.
Then, we must tell “dracut” about hibernation so that it generates initramfs accordingly. It is enough to create the file “/etc/dracut.conf.d/resume.conf” with this line:
1
add_dracutmodules+=" resume "
By the way, a quick way to do that is by running this command:
1
2
3
cat <<-EOF | sudo tee /etc/dracut.conf.d/resume.conf
add_dracutmodules+=" resume "
EOF
Then, we regenerate initramfs:
1
sudo dracut-rebuild
Now, edit your /etc/default/grub and specify resume in GRUB_CMDLINE_LINUX_DEFAULT, with the UUID of your swap partition. So it should be something like (remember that <UUID of your swap partition> must be replaced with the UUID; the “…” refer to existing options):
1
GRUB_CMDLINE_LINUX_DEFAULT="... resume=UUID=<UUID of your swap partition>"
Save the file and update the grub configuration:
1
sudo grub-mkconfig-o/boot/grub/grub.cfg
Now, reboot and hibernate should work. You can try that with the following:
During the last “Black Friday,” I bought this laptop:
Acer Aspire AV15-51-58J2 39,6 cm (15.6″) Full HD Intel® Core™ i5 16 GB DDR4-SDRAM 512 GB SSD Wi-Fi 6E (802.11ax) Windows 11 Home. (Intel Evo certified, by the way)
I paid 599 instead of 899 euros, that’s a significant discount (especially for its features, mentioned above and detailed in the post)!
This laptop caught my attention a few months ago due to its “eco” and “green” construction choices. You might want to look at https://www.acer.com/us-en/laptops/aspire/aspire-vero to know more about the recycled materials used for its construction. Besides these “green” appealing characteristics, I immediately found the laptop “beautiful” and pleasant at the touch.
In this blog post, I’ll describe my first impressions.
Here’s the unpacking. As you can see, the packaging is made of recycled paper:
The charger is not USB-C, unfortunately. However, it is pretty light. And the only USB-C port CAN NOT be used for charging, but only for data transfer:
And look: one of the containers can be used as a stand for the laptop (excellent!):
Besides the standard papers and a very minimal getting started guide (pretty useless), there are also some ecological stickers 🙂
Also, the inverted “R” and “E” (for the three words “Reduce”, “Reuse”, and “Recycle”) are a slight distinguishing touch (they’re on the keyboard cover as well):
And there are lots of ports (right side: USB 2 and headphone Jack; left: one HDMI, two USB 3, one USB-C – only data, no recharging, and an ethernet port, besides the recharging port). To be honest, I did not find the ethernet very comfortable to use, but maybe I need to get used to it.
This means there’s no SD card reader… Too bad!
The back shows that it should be easy to open the laptop (standard screws), though I still haven’t tried that:
Oh, and there are no painted elements on the laptop: there are engraved symbols and writings:
You see that the surface is anything but smooth, but that makes the laptop very pleasant to touch. Probably the best laptop surface I have ever had! Yes, that part is mostly recycled too, which is ecologically good! 🙂
The two lights on the right will tell you when the battery is charging (“red”: charging, “blue”: fully charged) and when the computer is on:
Unfortunately, these are the only LEDs provided by this laptop. This means that unless the operating system tells you something, you cannot know whether the num lock or the capslock is selected.
When you open the laptop (you can also open it with one hand), the screen slightly lifts the back of the laptop so that the ventilation works better.
Let’s turn it on and enjoy the nice booting logo:
The keyboard is backlit, and the light is good enough to use the keyboard comfortably. Unfortunately, after the backlight turns off because you haven’t used it for a while, just using the touchpad will not turn the backlit back on: you have to press a key.
The keyboard is lovely! At least, that’s the best keyboard I’ve used. Yes, better than Mac air, DELL XPS, and LG GRAM. It’s a great pleasure to type on this keyboard. The only bad part of this keyboard is that the “ENTER” key (“Invio” in Italian) is large enough but too close (actually, attached) to the other key (“ù” in the Italian version). But that’s a problem only for the first minutes of usage. I got used to it.
On the contrary, the touchpad is only “OK”. My other above-mentioned laptops have a much better touchpad. Having said that, this touchpad is usable anyway, though a bit tougher in some external points. If you click on the center, you have no problem. The touchpad is probably too smooth, and if your fingers are wet, you will experience some friction.
Another mechanism I had to change immediately was the function keys. As it happens in several modern laptops, by default, a function key does not behave like a function key but as the other functionality provided by the key (e.g., volume adjustment, light adjustment, etc.). Luckily, I almost immediately found the procedure to achieve that (once and for all) on the Acer website:
Enter the BIOS (you must press F2 while the laptop is booting when you see the “Acer” logo; in the BIOS, you can press Ctrl+S to enable hidden and advanced features; that’s not required for what I need to do in this specific case).
Then, in the main tab, you must change the “Function key behavior” to “Function Key”. Save and restart.
The laptop comes with Windows 11 Home installed. If you read my blog, you know that I’m not a Windows fan 😉 (I have already installed a few Linux distros in multi-boot, and I’ll blog about that in the future). However, Windows 11 is not that bad (well… it’s still Windows 😉 The theme provided by Acer is, of course, “green,” and I like it:
Of course, there were already several updates to apply, which took about an hour! The Windows installation already comes with Firefox installed and several other software. Unfortunately, this includes Norton security, which I had to uninstall immediately (too heavyweight).
The screen resolution is 1920×1080 60,05 Hz and by default Windows already configures 125% scaling. I had to turn it to 150%. Otherwise, it was too fainting for my eyes to using it.
Power consumption is good. I’m used to LG GRAM, Dell XPS, and Mac air, which provide much better battery time. However, this Acer is not impaired in that respect: they say it should provide about 9 hours of battery time. Of course, it’s less, but I found that by using it pretty intensively, you get 5 hours. In that respect, Acer provides its own application (just search for “Vero” in Windows) for choosing a battery profile:
Note that between the usual “Powersave” and “Balanced,” you have an additional “Eco Mode”.
This program also allows you to set the battery charge limit (to increase battery life):
Moreover, there’s also the program “Acer Aspire Center” with other valuable utilities:
To summarize, my first impressions are great! I like this laptop, and for the price I paid, it has excellent features. Moreover, as I said above, I also find it very beautiful. I appreciate the “green” and “eco” ideas and design choices behind this laptop!
Concerning portability, my Dell XPS 13, LG GRAM 16, and Mac air are, of course, better, but in the end, this laptop weighs less than 2 Kg, so it’s heavier than the others mentioned, but still portable enough.
Stay tuned for more blog posts on this laptop, especially concerning Linux on this laptop 🙂
This post will describe my experience installing Arch Linux on a PineBook Pro on external storage (USB stick in this example). Thus, the Manjaro default installation on the eMMC will not be touched. You should use a fast USB Stick, or the overall experience will be extremely slow. I’m using a SanDisk Extreme PRO, which is fast and feels like an SSD. This USB stick will be erased entirely, so don’t use a USB stick with essential data on it.
First, install the official Arch Linux ARM distribution; this will not be enough to have many hardware parts working (e.g., WiFi, battery management, and sound).
Then, add the repositories with kernels and drivers for the PineBook Pro.
The first part must be performed from an existing Linux installation on the PineBook Pro. I will use the Manjaro installation that comes with the PineBook Pro. The second part will be performed on the installed Arch Linux system on an external drive (a USB stick in this example). Since after the Arch Linux installation, the WiFi is not working, for this part, you need to connect to the wired network, e.g., with an ethernet USB adapter.
I insert my USB stick, which is /dev/sda. (Use “lsblk” to detect that.) From now on, I’m using this device. In your case, the device name might be different.
From now on, all the instructions are executed as “root” from a terminal window; thus, I first run:
1
sudo su -
I will do the following steps in a directory of the root’s home:
1
2
3
cd
mkdir pbp-install
cd pbp-install
We need to download and extract the latest release of Tow-Boot for the Pinebook Pro from https://github.com/Tow-Boot/Tow-Boot/releases. At the time of writing, the latest one is “2021.10-005”:
Now we flash Tow-Boot to /dev/sda (replace this with the device you are using).
Remember: this will wipe all the contents of the USB stick. Moreover, make sure you specify the right device, or you might overwrite the eMMC of the computer.
This process creates the partition table for the device, with the first partition for Tow-Boot. This created first partition must not be modified further. In fact, as you see in a minute, when we further partition the disk, we make sure to skip the first partition.
These are the contents of my terminal where I follow the above-mentioned instructions (since I had already used this USB stick for some experiments before writing this blog post, fdisk detects the existing ext4 signature):
1
2
3
4
5
6
7
8
9
10
11
12
13
14
15
16
17
18
19
20
21
22
23
24
25
26
27
28
29
30
31
32
33
34
35
36
37
38
39
Welcome to fdisk (util-linux 2.38.1).
Changes will remain in memory only, until you decide to write them.
Be careful before using the write command.
GPT PMBR size mismatch (26657 != 250085375) will be corrected by write.
The backup GPT table is not on the end of the device. This problem will be corrected by write.
Command (m for help): n
Partition number (2-128, default 2):
First sector (24640-250085342, default 26624):
Last sector, +/-sectors or +/-size{K,M,G,T,P} (26624-250085342, default 250083327): +256M
Created a new partition 2 of type 'Linux filesystem' and of size 256 MiB.
Command (m for help): x
Expert command (m for help): A
Partition number (1,2, default 2): 2
The LegacyBIOSBootable flag on partition 2 is enabled now.
Expert command (m for help): r
Command (m for help): n
Partition number (3-128, default 3):
First sector (550912-250085342, default 550912):
Last sector, +/-sectors or +/-size{K,M,G,T,P} (550912-250085342, default 250083327):
Created a new partition 3 of type 'Linux filesystem' and of size 119 GiB.
Partition #3 contains a ext4 signature.
Do you want to remove the signature? [Y]es/[N]o: Y
The signature will be removed by a write command.
Command (m for help): w
The partition table has been altered.
Calling ioctl() to re-read partition table.
Syncing disks.
Now we must format the boot and the root partitions. I’m going to use EXT4 for both:
1
2
mkfs.ext4 /dev/sda2
mkfs.ext4 /dev/sda3
Note that although the second command returns immediately, the EXT4 partition will be formatted in the background and will take some time (even with a fast USB stick).
Now we mount the two partitions:
mount the root partition (the 3rd partition) on “/mnt”
create the boot directory at the root of the mounted system
mount the boot partition (the 2nd partition) on “/mnt/boot”
1
2
3
mount /dev/sda3 /mnt
mkdir /mnt/boot
mount /dev/sda2 /mnt/boot
Now, we download the tarball for the rootfs of our USB stick installation. The instructions are once again taken from the link mentioned above, and they also include the verification of the contents of the downloaded archive:
Now, we must create the “/etc/fstab” on the mounted partition. To do that, we need to know the UUID of the two partitions by using “blkid”. You need to take note of the UUID from the output (which will be completely different according to the used external device):
We create the file “/etc/fstab” in “/mnt” accordingly (remember, the UUIDs and the partition types must be specified accordingly). I run “nano /mnt/etc/fstab,” and I append the following contents (I use “noatime” to reduce the number of writes on the external USB stick when used to run the installed OS):
And we can reboot into the (hopefully) installed Arch Linux on the USB stick to finish a few operations. Remember that we need a wired connection for the next steps.
Upon rebooting, you should see the two entries (if you let the timeout expire, it will automatically boot the first entry):
After we get to the prompt, we can log in with “root” and password “root” (needless to say: change the password immediately).
Let’s connect a network cable (you need a USB adapter for that), and after a few seconds, we should be online. We verify that with “ifconfig”, which should show the assigned IP address for “eth0”.
Since there’s no DE yet, I suggest you keep following the official web pages (and this blog post) by connecting to the PineBook Pro via SSH so that it will be easy to copy and paste commands into the terminal window of another computer. Moreover, when logged into the PineBook Pro directly, you will see lots of logging information directly on the console (I guess this could be prevented by passing specific options to the kernel, but we’ll install a DE later, so I don’t care about that much). The SSH server is already up and running in the PineBook Pro installed system, so once we know the IP address from the output of “ifconfig”, we can connect via SSH. However, root access via SSH is disabled, so we must connect with the other predefined account “alarm” and password “alarm” (again, you might want to change this password right away):
1
ssh alarm@<ip address>
Once we’re logged in since “sudo” is not yet configured, we switch to root:
What follows are my own instructions I usually run when installing Arch.
In particular, I configure time, network time synchronization, and timezone (Italy, in my case):
1
2
3
4
5
timedatectl set-timezone Europe/Rome
timedatectl set-ntp on
hwclock --systohc
The next step is required for doing gnome-terminal work (and it’s also part of the Arch standard installation instructions):
Edit “/etc/locale.gen” and uncomment “en_US.UTF-8 UTF-8” and other needed locales.
Generate the locales by running:
1
locale-gen
Edit the “/etc/locale.conf” file, and set the LANG variable accordingly, for example, for the UTF-8 local above:
1
LANG=en_US.UTF-8
We could run a first system upgrade
1
pacman-Syu
I don’t know if that’s strictly required because we’ll add the additional repository for the PineBook Pro in a minute. However, just in case, it might be better to update the system.
Let’s reboot and verify that everything still works.
NOTE: By the way, I noted that if I want to boot from the USB stick, it’s better to use the right-hand side USB port (which is USB 2) instead of the left-hand side port (USB 3). Otherwise, the system seems to ignore the system on the USB stick and boots directly to the installed Manjaro system.
Second part
As mentioned above, I suggest connecting to the PineBook Pro via SSH. In any case, what follows must be executed as “root” (“su -“).
Let’s now add the additional repositories with kernels and drivers specific to PineBook Pro.
Note that this project also provides a way to install Arch Linux directly with these repositories, with a procedure that is similar to the one in the first part. I prefer to install official Arch Linux first and then add the additional repositories, though.
And let’s install the packages specific to the PineBook Pro (note that we’re going to install the Linux kernel patched by Manjaro for the PineBook Pro):
Of course, we’ll have to answer “y” to the following question:
1
:: linux-manjaro and linux-aarch64 are in conflict (linux). Remove linux-aarch64? [y/N]
Let’s reboot and verify that everything still works (again, by connecting via SSH).
Now, we should be using the new kernel:
1
2
uname -a
Linux alarm 6.0.10-1-MANJARO-ARM #1 SMP PREEMPT Sat Nov 26 12:11:25 CET 2022 aarch64 GNU/Linux
Before installing a DE, I prefer creating a user for myself (“bettini”) and configuring it as a “sudoer”. (We must install “sudo” first).
1
2
3
4
5
pacman-Ssudo
useradd-mbettini
passwd bettini
usermod-aG wheel,sys,rfkill bettini
Then (by simply running “visudo”), we enable the users of the group “wheel” in “/etc/sudoers”; that is, we uncomment this line:
1
2
## Uncomment to allow members of group wheel to execute any command
# %wheel ALL=(ALL:ALL) ALL
Then, I try to re-connect with my user and verify that I can run commands with “sudo” (e.g., “sudo pacman -Syu”).
Before going on, I prefer to set up a SWAP file (of 8 Gb). The PineBook Pro has only 4 Gb of RAM, and it is likely to exhaust it. Using ZRAM did not work in my experience with Manjaro, so it’s better to have a SWAP file to avoid system hangs.
This takes some time. Then, I add the following line at the end of “/etc/fstab”:
1
/swapfile none swap defaults00
Install GNOME
As usual, I’m still doing these steps via SSH.
I’m going to install GNOME with some fonts, pipewire media session, firefox, and the NetworkManager (I’ll ignore dependencies that cannot be installed, e.g., “gnome-boxes” since I’m not going to use virtual machines on this machine):
It’s more than 500 Mb of packages to install, so please be patient.
Now, I enable the primary services (the login manager for GNOME, the NetworkManager to select a network from GNOME, and the profile daemon for switching between power profiles, e.g., “Balanced” and “Powersave”):
This time the graphical GDM login manager should greet us, allowing us to get into GNOME and select a WiFi connection.
NOTE: when GDM starts, I always hear a strange noise. It also happens with the pre-installed Manjaro. It must be the sound card that gets activated…
IMPORTANT NOTE: Upon rebooting, the WiFi does not always work (it looks like the WiFi card is not seen at all); that also happens with Manjaro. The only solution is to shut down the computer (i.e., NOT simply rebooting it) and boot it again.
And here’s the GNOME 43 setting on the right top corner showing the connected WiFi and the currently selected power profile “Balanced”:
By default, GNOME starts with the Wayland session. Everything seems to work; touchpad gestures work out of the box (3 finger swipes). Something does not look right in the Wayland session, though. For example, if you run Firefox, you cannot switch to it with Alt+Tab. I prefer to go for the X11 session for the time being (that’s selectable from the GDM’s gear icon on the bottom right corner once you select your user).
Here are a few screenshots of the GNOME activities and the currently installed applications:
The GNOME About dialog:
And of course, once installed, let’s run “neofetch”:
That’s all for now!
In another blog post, I described my customizations to GNOME (installed programs and configurations).
UI tests are delicate since when you run them, you must not interact with the computer, or you will disturb the tests, which will likely fail.
In Linux, you can use Xvfb, but windows will not have a title, which might break UI tests that rely on that. For example, Eclipse SWTBot tests work best if windows have titles.
The solution (I’m still talking about Linux) is to use Xephyr:
you start Xephyr by specifying a DISPLAY number
you start a Window manager on the same display
you run your UI tests on the same display
Now, you can interact with your computer without disturbing the UI tests. That’s very important if you need to debug the UI tests: if they don’t run in another display, the UI tests will likely fail if you switch to the debugger.
IMPORTANT: this works only when you’re on an X11 session (not Wayland).
The name of the package for Xephyr depends on your distribution. For example, in Arch Linux, you install it like that:
1
sudo pacman -S xorg-server-xephyr
Now, from a terminal window, you can start Xephyr (in this example, using the DISPLAY 50) and run a Window manager inside, specifying that it must run with X11.
If you’re on Gnome, you use mutter:
1
2
3
4
Xephyr -screen 1024x768 :50 &
sleep 5
export DISPLAY=:50
mutter --x11 --sm-disable --replace 2> ~/tmp/metacity.err &
If you’re on KDE, you use kwin:
1
2
3
4
Xephyr -screen 1024x768 :50 &
sleep 5
export DISPLAY=:50
kwin_x11 --replace 2> ~/tmp/kwin.err &
This is an example in Gnome: I ran the above commands, and then, from the same terminal (where DISPLAY is set to “:50”), I started the Gnome Text Editor, which appears in the Xephyr window:
In the following screenshot, I’m running the Maven build of one of the examples of my TDD Book, which uses AssertJ Swing for the UI tests of a simple Java Swing application (I started another terminal, where I exported the DISPLAY environment variable set to “:50”):
The UI tests (see the “MyAppWindow”) are undisturbed in the Xephyr window, and I can interact with my computer without breaking them.
From Eclipse, e.g., for a SWTBot test, you have to tweak the run configuration in the “Environment” tab:
And these are a few SWTBot tests for my Eclipse project EMF Parsley, which started from Eclipse but running in the Xephyr window:
While working on my TDD book, I played with Maven profiles to write the chapter.
If you use Maven profiles, you might want to use an activation strategy to enable the profile under certain circumstances automatically. There’s also a particular option, “<activeByDefault>”, which seems self-explanatory. This must mean that that profile will be constantly active by default unless you explicitly disable it, e.g., with “-P!profileid”.
This profile will automatically be active for all builds unless another profile in the same POM is activated using one of the previously described methods. All profiles that are active by default are automatically deactivated when a profile in the POM is activated on the command line or through its activation config.
Counterintuitive, but it’s like that, like it or not.
However, the documentation also tells you how to achieve the “really active by default”; it’s a matter of activating the profile when a property is NOT defined. Let’s create another profile following this approach:
XHTML
1
2
3
4
5
6
7
8
9
10
...
<profile>
<id>reallyActiveByDefault</id>
<activation>
<property>
<name>!skipMe</name>
</property>
</activation>
</profile>
...
And verify that:
1
2
3
4
5
6
7
8
mvn help:active-profiles -PanotherProfile
...
Active Profiles for Project 'com.examples:example-profiles:jar:1.0-SNAPSHOT':
The profile we’ve just added will be activated when the system property “skipMe” is not defined. So, it’s really active by default unless you pass to the command line “-DskipMe”.
Note also that the “<activeByDefault>” property is really misleading. In fact, as long as another profile is automatically activated (i.e., not explicitly), the “<activeByDefault>” is useless. In fact, with the profile we’ve just active since it’s really active by default, it also disables, by default, “notReallyActiveByDefault”:
1
2
3
4
5
6
7
mvn help:active-profiles
...
Active Profiles for Project 'com.examples:example-profiles:jar:1.0-SNAPSHOT':
If we define that property, the profile will be activated, and if we define that property with another value, it will not be activated (in any case, “reallyActiveByDefault” is still activated):
1
2
3
4
5
6
7
8
9
10
11
12
13
14
15
16
17
> mvn help:active-profiles -DactivateMe
...
Active Profiles for Project 'com.examples:example-profiles:jar:1.0-SNAPSHOT':
It’s been a long time since I wanted to test this Arch-based Linux distribution, XeroLinux. Finally, I found some time, and I first tested it in VirtualBox, and then I also installed that on one of my laptops.
What XeroLinux is about is summarized on its home page:
A Hobbyist Arch-Based Distro, built using ArcoLinux’s ALCI scripts that is meant to provide you with a stable base, making it simpler to install ArchLinux (Calamares) with a well optimized & Customized KDE Plasma, that you can shape YOUR way, the easy way… !
It’s an Arch-based distribution (not like Manjaro): it’s basically Arch with a few additional repositories that are mainly devoted to one of the main exciting features of XeroLinux, that is, a beautiful (good looking) KDE customized experience. And, although the “beauty is in the eye of the beholder”, XeroLinux KDE DE is indeed amazingly beautiful.
In this (long) post, I will summarize my overall experience of XeroLinux, starting from the installation to daily usage. Maybe it’s because I’m used to Arch, but I really like it!
Installation
The installation process starts, as usual, with a Live ISO. One of the fun things is that when you boot the Live image, the GRUB countdown emits a beep every second 🙂
When you get to the live environment, you can already understand the beauty of the KDE customizations (dock, global menus, blurring, etc.)
You’re then greeted by the XeroLinux Hello program:
If on a virtual machine, you can use one of the two buttons to fix the screen resolution. In general, you might want to “Update Arch Mirrorlist” right away. Then, just “Launch installer”.
The installer is based on the good old Calamares. If you’re already familiar with that, it will be easy! If not, it will not be that hard since the installer will ask you only the basic questions and will install all the default packages without further intervention.
Of course, the “Partitions” section is the critical one.
You probably wipe the whole (virtual) disk in a virtual machine. As usual, you can select a swap partition with hibernate. XeroLinux defaults to XFS, but I prefer BTRFS, which I’ve selected in my installations. As we’ll see later, the default layout of BTRFS subvolumes created by XeroLinux is also good!
When installed on my laptop, where I have several Linux installations, I chose the manual partitioning and manually created a new BTRFS partition while mounting another shared data partition. As usual, if you have an existing EFI partition, you must manually mount it in “/boot/efi”:
After reviewing the summary, it’s time to start the installation:
Do you see that green button on the bottom right? Click it, and you can see the log of the installer:
When the installation finishes, you get a message that the installation log can be found in the installed system:
Note: the first time I tried the installer on a virtual machine, Calamares crashed:
I had to start from scratch. The next time, I updated the mirrors before starting the installation, and the installation went fine. I can’t tell what went wrong the very first time.
The installed system
Let’s start with the impressions about the installed system.
The BTRFS subvolume layout looks good to me, or at least, that’s how I create the subvolumes myself in other distributions:
1
2
3
4
5
6
7
8
$ sudo btrfs su li /
ID 256 gen 220 top level 5 path @
ID 257 gen 221 top level 5 path @home
ID 258 gen 103 top level 5 path @root
ID 259 gen 39 top level 5 path @srv
ID 260 gen 106 top level 5 path @cache
ID 261 gen 219 top level 5 path @tmp
ID 262 gen 216 top level 5 path @log
where, besides the standard @ and @home, we have @log, @tmp and @cache that correspond to the directories in /var, @root is for the /root folder, and @srv for /srv.
These are the mount options of the BTRFS subvolumes (in the /etc/fstab file):
I don’t like the “discard=async” in the file /etc/fstab. Since fstrim is enabled once a week, I prefer not to have “discard=async” so I edited /etc/fstab accordingly. From what I know, the “ssd” should not be necessary since BTRFS should recognize that it’s using an SSD. However, it shouldn’t harm.
Another thing I don’t like is that the journald log is not persisted on reboots. I reported that on the forum, https://forum.xerolinux.xyz/thread-184.html. Apparently, that’s not intended. I can fix this by editing /etc/systemd/journald.conf and changing the line
1
Storage=volatile
to the default (you could simply remove the line, but I prefer to comment it to remember that the default is “auto”):
1
#Storage=auto
Moreover, I had to delete the file /etc/systemd/journald.conf.d/volatile-storage.conf (which also contains the “Storage=volatile”). Reboot, and now the log stays there even after rebooting.
The home page mentions, “This distro is 90% ArchLinux & 10% custom.” Indeed, these are the additional packages https://github.com/xerolinux/xerolinux_repo/tree/main/x86_64. Besides a few pre-compiled packages (instead of the source versions of the same packages in the AUR repository), there are many packages about theming. I’d tend to say that XeroLinux is “very” Arch, and I like that.
The installed KDE
As I had already anticipated, the KDE desktop environment, customized by XeroLinux, looks really good. It uses many parts from the Lyan theme and Tela icons (I had already blogged about that), however, for the “Application Style”, it uses Lightly instead of Kvantum (as shown in the XeroLinux site and videos, you can easily switch to different themes, actually “rices”, provided by XeroLinux itself). I was already a fan of Lyan and Tela, so I liked the outcome.
You find a dock at the bottom, which is a Latte dock. (By the way, by default, the Latte dock is set to “Dodge Maximized”, which is not ideal for me: I prefer “Dodge Active”.) Also, the top panel is not a standard panel: it’s, again, a Latte panel. They are both transparent (blurred), and you have a global menu, a la macOS. I’m not a big fan of the global menu, but I’ll try to stick with that for the time being. There are a few useful widgets: in the bottom dock, you have the CPU usage, and in the top panel, you have the network usage.
For KDE applications, you don’t need to go to the menu if you use the shortcut “Ctrl + Alt + I,” which opens a global search on the menus of that application (the so-called HUD). For example, here’s the HUD for Dolphin:
Speaking of KDE Desktop effects, you have several effects enabled by default: “Slide back”, “Wobby Windows”, etc. Not the “Magic Lamp” effect, which is one of my favorites, but enabling that is easy.
Moreover, you get “blurred” in most places. It’s eye candy, and I like it 🙂 In that respect, as mentioned on the XeroLinux site, you need a powerful computer to deal with all these effects. On my Dell XPS 13, everything is smooth. Moreover, I don’t see such effects impacting power consumption when on battery.
Look at the blurred effect on the custom Konsole profile (which is set as the default one):
And what about the cool “ls” output? Well, that’s because “ls” is automatically aliased to exa, a modern replacement for ls.
By the way, Dolphin is already configured with the Dropbox plugin enabled. As soon as you install Dropbox, you have overlay decorations on the Dropbox folder.
Moreover, also the KDE drop-down terminal, Yakuake, is already configured and ready to use with F12.
Speaking of searching, the custom “Application Menu” separates search results (files, i.e., “Desktop search”, “Settings”, “Applications”, etc.):
The Xero Hello program is also very useful! It provides several menus
The “Install Drivers”:
I particularly like the “Post-Install System Configuration”:
For example, it has a menu for switching the shell from BASH to ZSH with Oh My Zsh (including a few common plugins, e.g., completions, suggestions, and source highlight, not to mention the beautiful Powerlevel10k theme). It takes care of cloning Oh My Zsh, and its plugins and sets the shell for the current user:
The “Update System Now” is also very powerful. It gives you a choice to update Everything (by relying on Topgrade): not only Pacman, AUR, and Flatpak packages but also fuwpd, Oh My Zsh and its plugins (if you installed that), and Docker images (if you have installed Docker).
Final thoughts
I like XeroLinux, and I like its BEAUTIFUL theming! It makes me want to use KDE again 🙂
Most of all, I think it is similar to EndeavourOS, which I also like: it’s basically Arch (not like Manjaro, which I evaluated in the past, but which somehow twisted Arch) with interesting customizations.
In a previous post, I showed an example of an Ansible role tested with Molecule and Docker using the Gitpod development environment. With such an approach, you develop using Visual Studio code on your browser. Resources and computational power is provided by Gitpod, not by your computer. When your computer is a PineBook Pro, an arm-based laptop with low computational power and just 4 Gb of RAM, using Gitpod makes the difference. Though I guess it’s possible to install Docker on the PineBook Pro, I doubt it’s feasible to efficiently use it for testing Ansible roles with Molecule and Docker.
But with Gitpod, it can be done! Here’s my Firefox browser on a PineBook Pro with an open Gitpod workspace:
I can quickly develop and run Molecule tests or manually enter the Docker containers after running Ansible playbooks on them!
I doubt developong and testing such things completely on a PineBook Pro would be this comfortable and efficient! 🙂
I’ve updated KDE to version 5.26, which arrived in Linux Arch. In particular, I’m testing this new version in my XeroLinux installation.
One of the improvements that caught me immediately was how this version’s Overview effect has improved!
In the previous version (KDE 5.25), the Overview allowed to search both in applications and in currently opened windows (besides providing search results for other things such as files, folders, and other options configured in “Plasma Search”). However, opened windows and other search results were all mixed in the dropdown list. Although opened windows were reported slightly different from other results, they were all together. Moreover, open windows were not shown after you started typing in the filter text box. On the contrary, I would have liked some visual filtering for open windows, like in the “Present Windows” effect. For this reason, I was using “Present Windows” most of the time for searching for open windows and KRunner for everything else.
This behavior has changed now: the Overview behaves just like I would have liked. If what you typed in the search text box matches any open windows (name of the application or title of a window), the open windows are filtered, and no other search results are shown. On the contrary, if what you typed in the search text box does not match any open windows, you get the other results! Well done! 🙂
Here are a few screenshots demonstrating this new behavior (I opened a few applications and Firefox on a page containing “KDE” in the title).
This screenshot shows the Overview effect when invoked:
If I press “k”, only Kate, Konsole, and Firefox windows are shown (remember, Firefox has “KDE” in the title):
If I enter “ka”, only Kate is shown:
If I enter “ko”, only the two Konsole windows are shown:
If I enter “kd” or “fi”, then only Firefox is shown:
If I enter “chr”, then since “No matching windows” are found, I get the standard search results:
I hope this behavior of the Overview effect won’t change in future versions because I like it, and, IMHO, that’s how it should be 🙂
Note: as it happened in the past, the Overview effect sometimes crashes when you select a window or something from the search results. As a result, kwin restarts automatically. Sometimes, after an update, this is fixed. Sometimes, the bug shows up again.
As a comparison, this is the old behavior of the Overview. Here’s a screenshot with two applications opened, including a Konsole window:
If I start typing “kon”, I get the full list of search results:
It is true that the open window of Konsole is the first result, but I find this old behavior harder to use: it’s harder to spot the open window.
I’m mainly a Java developer and still haven’t found a way to use Gitpod for Java development. Gitpod allows you to spin up fresh development environments from your GitHub projects so that you can code with Visual Studio on the web (that’s just a very reductive definition, so you may want to look at its website for the complete set of features). I honestly prefer to have my IDE (Eclipse) on my computer.
However, I probably found a use case for Gitpod that’s also good for me! I recently started playing and having fun with Ansible to automate all my Linux installations. I’m also test-addicted and want to test my Ansible playbooks and roles automatically. For testing Ansible playbooks and roles, I use the mainstream technology Molecule. Molecule allows you to thoroughly test Ansible tasks by running them against a Docker container. (I’ll blog about my Ansible playbooks, roles, and how I use Molecule shortly.)
Once you have Docker installed on your system, setting up Ansible and Molecule is not hard. However, due to the used technologies, running Molecule tests stresses your computer a bit due to disk usage (because of Docker images and containers; also because Molecule allows you to test Ansible tasks against different Docker images) and due to computational power. Indeed, it would be best if you had a powerful computer to use Molecule. I don’t always have one with such computation power with me; if I have, I might need that with some concurrent development tasks.
That gave me a chance to evaluate Gitpod for the task of testing an Ansible role with Molecule on Gitpod. In this blog post, I’ll detail, step by step, how I set up my Gitpod development environment for this job. The Ansible role used in this example is trivial and is not the post’s goal.
On my computer, I install Ansible and Molecule (with Docker support) with the following pip command:
1
pip install ansible"molecule[docker]"
Then I create an Ansible role ready to be tested with Molecule as follows:
1
molecule init role lorenzobettini.a_role --driver-name docker
Now, I can start Gitpod for this repository using the button (as I said, you need to use a browser extension; otherwise, you have to prefix the URL appropriately):
Let’s press the “Gitpod” button. The first time you use Gitpod, you’ll have to accept a few authorizations.
NOTE: in this blog post, I’m using the light theme of Visual Studio in Gitpod.
Once the Visual Studio code was open in the browser, I was welcomed by a “Get Started with Gitpod”:
First, let’s set up the main developer tools in the Gitpod workspace (a Linux OS): Ansible and Molecule. We’ll install them using Python Pip (as I’ve done on my local machine), which is already available in Gitpod.
In the Visual Studio terminal, I run:
1
pip install ansible"molecule[docker]"
The above command will take about a minute to terminate (we’ll get back to this later)
Then, we can verify that molecule (and ansible) are installed:
Now we can run Molecule from within the Gitpod workspace. We can try and run “molecule converge” (though our Ansible role doesn’t do anything at the moment). After that, we can enter the container with “molecule login” (from the generated molecule/default/molecule.yml file, we can see that it’s based on the Docker image “quay.io/centos/centos:stream8“):
Instead of running “converge”, we can let Molecule create the Docker image with “molecule create“. We would still be able to enter the Docker image as above.
Let’s stop the workspace:
(To close a workspace, we could close the workspace browser tabs: within three minutes, the workspaces will be stopped.)
If we get back to Gitpod and create a new workspace (that is, we don’t use the Gitpod dashboard to restart the workspace we have just stopped), we will lose the installed programs ansible and molecule. Let’s make the installation of these tools permanent, so we’ll find them each time we start a Gitpod workspace for this GitHub project.
To do that, let’s run “gp init“. This command will create a new .gitpod.yml file (with some example contents; see the documentation for more details about this file) where we can configure the workspace for our project. This configuration will be stored in the git repository of this project. Once this file is in place, Gitpod will pre-configure our workspace each time we enter Gitpod for the current project.
I’m changing the file as follows:
YAML
1
2
tasks:
- init: pip install ansible "molecule[docker]" # runs during prebuild
To test your .gitpod.yml file, you need to commit and push the file to your repository and open a new workspace either by using the Gitpod extension or prefixing your repo URL with https://gitpod.io/#.
If you don’t want to have multiple commits as you’re testing and making changes to your .gitpod.yml, you can make changes from a new branch.
For the moment, let’s commit and push directly to the master or main branch (of course, by using Visual Studio):
Let’s stop the workspace and get back to Gitpod. We will see the output of our “init” command, and Ansible and Molecule will be available.
However, from what I understand, for installing programs that are indispensable during development, instead of using an “init” task, it’s better to provide a custom Docker image with the programs already installed.
To do that, we add this section to the .gitpod.yml file:
YAML
1
2
image:
file: .gitpod.Dockerfile
Then, we create the file .gitpod.Dockerfile. As soon as the file is created and opened, Visual Studio suggests we install the Docker extension in Visual Studio:
Let’s choose “Install Do not Sync”. Once the extension has been installed, we can use the gear icon and specify to add the extension to the .gitpod.yml file:
The file will be automatically modified with the following new section:
YAML
1
2
3
4
...
vscode:
extensions:
-ms-azuretools.vscode-docker
This way, each time we open the workspace of the project or someone else does (e.g., for contributing), the Docker extension will be automatically available.
Let’s implement the Dockerfile by starting from the full Gitpod workspace image (the one we have used so far because it’s the default image) and by installing Ansible and Molecule in the Docker image:
1
2
3
FROM gitpod/workspace-full:latest
RUN pip install ansible"molecule[docker]"
Note: Gitpod suggests using a specific tag instead of “latest” to help the reproducibility of the workspace. For this simple example, we’ll simply use “latest”.
Now that we have a custom Dockerfile for the image of our Gitpod workspace, instead of stopping the workspace and opening a new one, it might be better first to verify whether we can build such an image (remember, in Gitpod, you have docker available after all):
Then, we can enter that image and verify that our desired programs are installed:
1
docker run-it gitpod-dockerfile-test bash
Doing such a check before starting a new workspace lets us immediately spot possible problems with our custom image.
You notice that building the Docker image takes a lot of time. That’s because we started from the full Gitpod base Docker image (a big image), which contains support for several languages. We’ll optimize this later.
We remove the “init” task from the .gitpod.yml file. However, we can use a “before” task specific to this project (the pip packages are typical of Ansible and Molecule projects). We have Molecule create the Docker instance (see the molecule.yml file shown above in the screenshot). This will make the Docker image used in our Molecule tests already pulled when we open the workspace:
YAML
1
2
tasks:
- before: molecule create # executed on every start and is expected to terminate
To summarize, this is the .gitpod.yml file (note that I also added the Gitlens extension, which is very useful for Git repositories):
YAML
1
2
3
4
5
6
7
8
9
10
image:
file: .gitpod.Dockerfile
tasks:
- before: molecule create # executed on every start and is expected to terminate
vscode:
extensions:
-ms-azuretools.vscode-docker
-eamodio.gitlens
We can start a new workspace. Now Gitpod knows about our custom Dockerfile and builds that image for us. In particular, whenever we start Gitpod for this repository, Gitpod checks whether the Dockerfile has been updated and rebuilds the image if needed. Thus, building our custom Docker image will take some time only the first time, and if we change the Dockerfile.
When the workspace start, we’ll see Gitpod building our image:
Similarly to when we built our custom Docker image in the workspace, this will take some time because we start from the vast “workspace-full” image.
Maybe we can do better and start from the Gitpod workspace image that provides only Python support. After all, for this project, that’s all we need (we don’t need Java, C++, etc.):
1
2
3
4
FROM gitpod/workspace-python:latest
RUN pip install--upgrade pip
RUN pip install ansible"molecule[docker]"
I also took the chance to update Pip itself. In the previous runs, I had seen such a message:
1
2
[notice]Anewrelease of pip available:22.2.2->22.3
[notice]Toupdate,run:pip install--upgrade pip
As done before, let’s first check that the image builds fine locally and that, in the end, it contains our required software.
We can start a new workspace. Gitpod realizes that our Dockerfile has changed and rebuilds it. This time, this should be faster.
It took some time, but now we have an IDE for our project on the web. The files we have created can be reused for similar projects. For projects using different languages, the customization will be different.
We can start implementing the tasks for our role. For example, let’s edit the file tasks/main.yml. In this example, we want to install ZSH:
YAML
1
2
3
4
5
6
7
---
# tasks file for a_role
- name: Install ZSH
become: true
ansible.builtin.package:
name: zsh
state: present
Let’s save, and run “molecule converge” (remember, the Docker image for our molecule test has already been downloaded during the workspace opening). We’ll get an error:
fatal: [instance]: FAILED! => {"changed": false, "module_stderr": "/bin/sh: sudo: command not found\n", "module_stdout": "", "msg": "MODULE FAILURE\nSee stdout/stderr for the exact error", "rc": 127}
That’s because “sudo”, which is required by our task (“become: true”), is not installed in the Docker image we use for testing (“quay.io/centos/centos:stream8“). We can prepare our instance with a molecule/default/prepare.yml playbook or use another RedHat-based Docker image, which already comes with “sudo”, e.g., “fedora:36”. For this simple example, I’ll go with the latter solution. We change molecule/default/molecule.yml accordingly:
YAML
1
2
3
4
5
6
...
platforms:
- name: instance
image: fedora:36
pre_build_image: true
...
Since we have now changed the Docker image for Molecule tests, we must first “destroy” the current Molecule image (“molecule destroy“) and then try to “molecule converge” (this time, a new Docker image will be downloaded). Now “converge” should succeed. We can also run a complete Molecule scenario with the command “molecule test” (this will also check idempotency and verify possible assertions; currently, we don’t have any assertions).
We can also add a badge to the README of the GitHub repository to quickly jump to Gitpod. That’s useful for contributors who don’t have the Gitpod extension. The markdown code for the badges can be found at https://www.gitpod.io/docs/introduction/getting-started. For this project, I add this markdown code to the README file:
1
[](https://gitpod.io/#https://github.com/LorenzoBettini/ansible-molecule-gitpod-example)
You may want to experiment with other Visual Studio extensions like the “Ansible” extension. If you install that, you’ll get a warning of the shape:
That’s because we haven’t installed the command “ansible-lint”. We can do that with Pip. We should also update our custom Docker image accordingly. I will not do that for this simple example, though.
That’s all for now. I hope you found this post useful to get started with Gitpod 🙂
22/Dec/2022: added the flag “-czstd” for defragmentation and compression.
20/Nov/2022: documented the new version of grub-btrfs and its new grub-btrfsd daemon; the configuration for Timeshift is much simpler, but you have to install another package: inotify-tools.
17/Nov/2022: documented that I could also create additional subvolumes and move existing contents from the running system
In this post, I’ll describe the same procedure I described in one of my previous posts but applied to Ubuntu (in particular, Ubuntu Jammy 22.04). I’m not describing an autosnap mechanism when performing package updates in Ubuntu, though you might want to try timeshift-autosnap-apt for that.
If you choose the BTRFS filesystem when you install Ubuntu, you get the two subvolumes “@” for “/” and “@home” for “/home”, which will make Timeshift work since that’s what Timeshift expects to find to take BTRFS snapshots.
However, some adjustments are still worth making to avoid useless data ending in the snapshots and to be able to boot snapshots directly (with the help of grub-btrfs).
Adjust compression
Ubuntu does not mount BTRFS subvolumes with compression. Instead, I prefer to have compression on BTRFS.
To do that, right after the installation, I change /etc/fstab by adding compression and “noatime” to the existing entries for “/” and “/home” (as usual, UUID must be replaced with the UUID of your disk partition):
Save the file, reboot, and perform “defragment” so that the existing data gets compressed:
1
sudo btrfs fi defragment / -r -czstd
It’s also best to create /var/lib/portables and /var/lib/machines if not already there
1
2
sudo mkdir-p/var/lib/portables
sudo mkdir-p/var/lib/machines
I’m not using these directories, but it looks like systemd creates them automatically as nested subvolumes. Nested subvolumes will force you to do some manual removal after restoring a snapshot and removing old snapshots.
The current situation of subvolumes should be as follows:
1
2
3
sudo btrfs su li/
ID256gen2342top level5path@
ID257gen2342top level5path@home
Create additional subvolumes
With the current subvolume layout, things like logs and caches will end up in snapshots, giving you problems when you try to boot a snapshot (which we want to be able to do).
Creating a subvolume for the whole /var directory is not ideal because we lost the contents of essential things like /var/lib in the snapshot, so we could not restore a snapshot correctly. Instead, we create subvolumes to mount /var/log, /var/cache, and /var/tmp.
Since we have to move the existing contents of such directories into the new subvolume, it’s better to operate from a Live ISO.
UPDATE 17/Nov/2022: I also tried to create the new subvolumes and move the existing contents in the running system, following the steps described below. It worked! However, I’d still suggest you do the next steps from a Live ISO because you never know 😉
So, let’s boot a Live ISO (e.g., Ubuntu live installation medium).
Switch to superuser (no password required in the live media):
1
sudo su-
Mount the BTRFS filesystem into /mnt, which should already exist in the live media. We have to mount the partition hosting our existing installation. In my example, it is /dev/sdb10:
1
mount/dev/sdb10/mnt
You should see the existing subvolumes in the mount directory:
1
2
3
4
ls-l/mnt/
total0
drwxr-xr-x1root root172Aug2012:47@
drwxr-xr-x1root root14Oct1807:44@home
Create the new subvolumes
1
2
3
btrfs subvolume create /mnt/@log
btrfs subvolume create /mnt/@cache
btrfs subvolume create /mnt/@tmp
Here are the new subvolumes:
1
2
3
4
5
6
7
ls -l /mnt/
total 0
drwxr-xr-x 1 root root 172 Aug 20 12:47 @
drwxr-xr-x 1 root root 0 Oct 18 12:16 @cache
drwxr-xr-x 1 root root 14 Oct 18 07:44 @home
drwxr-xr-x 1 root root 0 Oct 18 12:16 @log
drwxr-xr-x 1 root root 0 Oct 18 12:16 @tmp
Let’s move the contents of /mnt/@/var/log to /mnt/@log and the same for /mnt/@/var/cache into /mnt/@cache
1
2
mv /mnt/@/var/cache/* /mnt/@cache/
mv /mnt/@/var/log/* /mnt/@log/
The directory /mnt/@/var/tmp/ should be empty, so there’s nothing to move (you may want to check that).
Adjust the fstab of the installed system to point to the renamed subvolumes and mount the new subvolumes as /var/log, /var/cache, and /var/tmp
1
nano /mnt/@/etc/fstab
You will have to use the correct UUID, which is the same as the one for the already mounted volumes (when you copy and paste, make sure you update both the mount point and the subvolume name consistently):
and we should be able to reboot the system, hopefully without problems
Install Timeshift
We can install it from the Ubuntu repositories with
1
sudo apt install timeshift
NOTE: since this is not the latest version, Timeshift will always generate snapshots in the same directory, so there’s no need for the additional fixed mount point as in Arch (see my previous post).
Let’s create a new Timeshift snapshot and browse it with the Timeshift toolbar button “Browse”. We can verify that the directories @/var/log, @/var/cache, and @/var/tmp are empty in the snapshot. The same holds for home (but that was already true thanks to the initial subvolume for home).
Configure grub-btrfs
We have to install grub-btrfs from sources because there’s no official package for Ubuntu. However, after installing the dependencies,
We now need to configure that to monitor the Timeshift snapshot directory instead of the default one (/.snapshots).
Updated version (20 November 2022)
UPDATE 20/Nov/2022: A new version of grub-btrfsd is available only by installing from sources. What follows is based on this new version. At the bottom of the post, there are still the old instructions, but they’re not valid anymore.
If you see an ASCII splash screen installing grub-btrfs from sources, you’re using the latest version.
Now, let’s make sure grub-btrfs can find Timeshift’s snapshots (remember, we’ve just created one). So let’s run update-grub, and we should see in the end something like the following output:
The last lines prove that grub-btrfs can detect snapshots.
Automatically update the grub menu upon snapshot creation or deletion (20 November 2022)
UPDATE 20/Nov/2022: A new version of grub-btrfsd is available only by installing from sources. What follows is based on this new version. At the bottom of the post, there are still the old instructions, but they’re not valid anymore.
Grub-btrfs provides a daemon watching the snapshot directory and updates the grub menu automatically every time a snapshot is created or deleted.
Important: This daemon requires an additional package:
1
sudo apt install inotify-tools
By default, this daemon watches the directory “/.snapshots” (the default directory for Snapper). Since Timeshift uses a different directory, we have to tweak the configuration for the daemon.
This is required for Timeshift version 22.06 and later because Timeshift creates a new directory named after their process ID in /run/timeshift every time they are started. Since the PID will be different every time, also the directory will be different. Grub-btrfs provides the command line argument –timeshift-auto to correctly detect the current snapshot directory (In previous versions of grub-btrfs, we had to tweak /etc/fstab to deal with that).
Let’s start the daemon:
1
sudo systemctl start grub-btrfsd
In the journalctl log, we should see something like (where the date and time have been stripped off):
1
2
grub-btrfsd[9965]: grub-btrfsd starting up...
grub-btrfsd[9989]: Watching /run/timeshift for timeshift to start
Let’s start Timeshift. In the journalctl log, we should see something like this:
1
2
3
4
grub-btrfsd[10307]: detected Timeshift startup, PID is: 10232
grub-btrfsd[10612]: Watching /run/timeshift/10232/backup/timeshift-btrfs/snapshots for new snapshots...
Let’s verify that if we create a new snapshot, grub-btrfs automatically updates the GRUB menu: in a terminal window, run “journalctl -f” to look at the log, then create a new snapshot in Timeshift. In the log, you should see something like the following lines:
1
2
3
4
5
6
7
8
9
timeshift-gtk.desktop[10232]: Created directory: /run/timeshift/10232/backup/timeshift-btrfs/snapshots/2022-11-20_17-31-59
grub-btrfsd[10667]: Detected snapshot creation/ deletion, recreating Grub menu
timeshift-gtk.desktop[10232]: Created subvolume snapshot: /run/timeshift/10232/backup/timeshift-btrfs/snapshots/2022-11-20_17-31-59/@
timeshift-gtk.desktop[10232]: Created control file: /run/timeshift/10232/backup/timeshift-btrfs/snapshots/2022-11-20_17-31-59/info.json
Similarly, if we delete an existing snapshot, we should see something similar in the log.
Remember that it takes a few seconds for grub-btrfs to recreate the grub menu.
Once we’re sure everything works, we can enable the daemon to always start at boot:
1
sudo systemctl enable grub-btrfsd
The next time we boot, our grub menu will also show a submenu to boot snapshots.
Concerning doing some experiments booting a snapshot and restoring it, please look at my other post.
Old version (with old release 4.11)
UPDATE 20/Nov/2022: These are the older instructions for the previous version of grub-btrfs, where there was no “grub-btrfsd.service” and there was another systemd program (“grub-btrfs.path”).
I leave these instructions here just for “historical reasons”.
Let’s verify that if we create (or delete) a snapshot, grub-btrfs automatically updates the GRUB menu: in a terminal window, run “journalctl -f” to look at the log, then create a new snapshot in Timeshift. In the log, you should see something like the following lines (where the date and time have been stripped off):
Baloo is the file indexing and file search framework for KDE Plasma, with a focus on providing a very small memory footprint along with extremely fast searching.
Unfortunately, it has a bad reputation for being a resource hog. However, it all boils down to configuring it appropriately (of course, according to your needs), and not only will it be “tamed”, but it will also work fast, using a few resources, and it will be your friend when using KDE.
In this article, I describe how I configure it to be fast and functional without being a resource hog.
I anticipate that I use baloo only for file search, NOT content searching. I don’t think baloo is the best tool under that concern because it updates its index continuously. For content searching, I suggest Recoll. You can configure Recoll to update the index a few times daily, which is typically enough. Moreover, Recoll provides more powerful query mechanisms for content searching than baloo. If you want baloo to index file contents, remember that this requires more resources and time to complete.
First of all, configuring baloo should be the first thing you do after you install KDE and log in to KDE for the first time. At least, it would be best if you disabled it before filling your home folder with all your contents.
Whether baloo is enabled or disabled by default depends on the distribution. Go to System Settings -> Search -> File Search.
In this example, it’s disabled. Let’s check “Enable File Search” and uncheck “Also index file content” (at least, I disable indexing of file contents for the reasons I said above). DON’T PRESS “Apply” yet. Another problem with the default configuration is that it will index all the files in your home folder. That’s probably too much unless you want to search everywhere in your home folder (including temporary files, locally installed binaries, etc.).
In that respect, I prefer to exclude my home folder and provide some subfolders to be indexed. So I use the dropdown menu and exclude my home folder:
Then, I add the folders I want to be indexed with the button “Start indexing a folder…”:
Now, you can hit “Apply”, and after some time, you can see that indexing completes. With an SSD and indexed folders that do not contain many files, it takes baloo just a moment to index the selected folders.
You may also want to learn to use the command balooctl from the terminal to have more control over baloo and retrieve indexing information. For example, here’s an example of the status subcommand and its result on my system after the configuration above and after the indexed directories are filled with my data:
1
2
3
4
5
6
7
$ balooctl status
Baloo File Indexer is running
Indexer state: Idle
Total files indexed: 49.275
Files waiting for content indexing: 0
Files failed to index: 0
Current size of index is 21,96 MiB
Learning more about baloo configuration to have fine-grained control of its indexing functionality is even better. For example, you can refine the configuration by excluding some files from the specified indexed folders based on their extensions or with regular expressions. As far as I know, you cannot do that from the system setting’s dialog shown above. You have to tweak the configuration file ~/.config/baloofilerc.
The interesting part is “exclude filters=…” where you specify a comma-separated list of regular expression for excluding files or folders. It comes prefilled with some sensible values for exclusions. You can add your own exclusion filters.
After modifying this files, I’d suggest you rebuild the index with this command:
1
2
3
4
$ balooctl purge
Stopping the File Indexer .... - done
Deleted the index database
Restarting the File Indexer
After the index is recreated, many files have been excluded:
1
2
3
4
5
6
7
$ balooctl status
Baloo File Indexer is running
Indexer state: Idle
Total files indexed: 23.676
Files waiting for content indexing: 0
Files failed to index: 0
Current size of index is 10,56 MiB
You can enjoy baloo file search from the “Search” in the “Application Menu” and from “KRunner” (Alt+space). In that respect, KRunner might take some time before it correctly shows the indexed files after a re-index.
Now, baloo is tamed and you can enjoy its features without losing your resources.
Final thoughts: for you sure, you must make sure things like BTRFS snapshots don’t end in the folders to be indexed, or you will have several problems, including lots of resource usage not to mention duplicate results during the search.
In this post, I’ll describe a few problems with Docker in Fedora and how to fix them. In particular, I’ll try to provide an analysis of the problems and the sources of the solutions.
I’ve experienced a few problems with Docker in Fedora (35 and 36). I first installed docker-ce by following the official documentation: https://docs.docker.com/engine/install/fedora/. Things went smoothly at the beginning with the first Docker images, e.g., the “hello-world”, “ubuntu,” and a few others.
However, I started to experience severe problems with this image “mysql:5.7”: the container took a lot of time to start, and I noted that Docker immediately ate my whole RAM, 16 Gb. If I don’t terminate the process, the computer will likely hang in a minute or less.
This is a docker-compose file to recreate the problem:
YAML
1
2
3
4
5
6
7
8
9
10
11
services:
db:
image: mysql:5.7
environment:
-MYSQL_ROOT_PASSWORD=somewordpress
-MYSQL_DATABASE=wordpress
-MYSQL_USER=wordpress
-MYSQL_PASSWORD=wordpress
expose:
-3306
-33060
Save it to “docker-compose.yaml” and start it with “docker-compose up” and see the problem.
You must install the package docker-compose from Fedora’s repositories to verify the problem. I anticipate that the problem is not due to docker-compose because I have precisely the same problems with the above Docker image even if I run it without docker-compose (e.g., during a Maven build).
There’s no problem with a more recent version of the MySQL image, e.g., “mysql:8.0.27”. However, there’s something wrong with Docker in Fedora because the same docker-compose file using “mysql:5.7” does not give me any problem and works perfectly in other Linux distributions like Ubuntu and Arch.
I also experienced slow performance and ram draining when running an ansible molecule test with one of my ansible playbooks, e.g., running a flatpak installation in a Docker container. Again, only in Fedora.
Instead of using “docker-ce”, I tried moby-engine (https://mobyproject.org/), which provides the same “docker” command line tools. The existing docker-compose works with moby as well. As stated here https://fedoramagazine.org/docker-and-fedora-35/, moby-engine is the “Fedora’s way” (though the official Docker package is said to work as well).
Surprise! the above docker-compose file works like magic: it starts fast and does not eat RAM. Also, my ansible molecule tests work perfectly.
Unfortunately, you run into problems using the excellent Testcontainers library. This problem is due to SELinux (that figures!!!). You can use this example project (taken from my TDD book): https://github.com/LorenzoBettini/it-docker-mongo-example. If you have Java and Maven installed, you can clone the repository, enter the directory “com.examples.school,” and run “mvn verify”. When it comes to Testcontainers tests, you get errors of this shape:
1
2
3
4
5
6
7
8
9
10
11
12
13
14
15
16
17
18
[main] DEBUG com.github.dockerjava.zerodep.shaded.org.apache.hc.client5.http.impl.io.PoolingHttpClientConnectionManager - ep-00000009: connection released [route: {}->unix://localhost:2375][total available: 2; route allocated: 2 of 2147483647; total allocated: 2 of 2147483647]
[main] WARN org.testcontainers.utility.ResourceReaper - Ryuk container cannot be inspected and probably had a problem starting. Ryuk's logs:
Pinging Docker...
panic: Got permission denied while trying to connect to the Docker daemon socket at unix:///var/run/docker.sock: Get http://%2Fvar%2Frun%2Fdocker.sock/_ping: dial unix /var/run/docker.sock: connect: permission denied
[main] DEBUG org.testcontainers.DockerClientFactory - There is a cached checks failure - throwing
java.lang.IllegalStateException: Ryuk failed to start
at org.testcontainers.utility.ResourceReaper.start(ResourceReaper.java:15
Caused by: com.github.dockerjava.api.exception.NotFoundException: Status 404: {"message":"No such container: ..."}
If you temporarily disable Selinux:
1
sudo setenforce0
The Testcontainers tests will succeed.
However, let’s try to fix this problem once and for all.
To understand why moby-engine’s docker command works while docker-ce’s docker does not I inspected the version of the file /usr/lib/systemd/system/docker.service file provided by the moby-engine’s installation and the version provided by docker-ce’s installation.
These are the interesting parts of the docker.service file that comes with the moby-engine package:
1
2
3
4
5
6
7
8
[Service]
Type=notify
EnvironmentFile=-/etc/sysconfig/docker
ExecStart=/usr/bin/dockerd\
--host=fd:// \
--exec-opt native.cgroupdriver=systemd\
$OPTIONS
...OTHER LINES
While these are the corresponding parts in the version of the file provided by the docker-ce package:
docker-ce uses a simple command to start the Docker daemon
moby-engine passes more arguments and relies on additional arguments (the OPTIONS environment variable) read from the additional file /etc/sysconfig/docker, whose contents are listed here:
1
2
3
4
5
6
7
8
# Modify these options if you want to change the way the docker daemon runs
First, I like this approach of relying on a separate file, which the user can customize. I understand that updates to the moby-engine package will not overwrite this file.
Thus, to avoid the Selinux problem with Testcontainers, it is enough to remove the “–selinux-enabled” argument in the above file. These are the steps:
Stop docker, “sudo systemctl stop docker”
Modify the file as follows:
1
2
3
4
5
6
7
# Modify these options if you want to change the way the docker daemon runs
Moreover, disabling SELinux in the above file is also required if you, like me, prefer to have the docker directory (by default, it is /var/lib/docker) in another place (e.g., in a standard partition, which is not BTRFS and which is shared among several Linux distributions on the same computer).
Here’s an example of customization of the above file to tell Docker to use a different root directory:
If you use a different root directory with SELinux enabled, you might get errors when running containers of the shape
1
2
3
4
5
6
$ docker-compose up
Starting docker-compose-mysql_db_1 ... done
Attaching to docker-compose-mysql_db_1
db_1 | /bin/bash: error while loading shared libraries: /lib64/libc.so.6: cannot apply additional memory protection after relocation: Permission denied
docker-compose-mysql_db_1 exited with code 127
Fixing docker-ce
By taking inspiration from the configuration of moby-engine, we can also fix docker-ce by tweaking its configuration.
Of course, stop the Docker service (“sudo systemctl stop docker”) before doing the following steps.
It makes no sense to modify the file /usr/lib/systemd/system/docker.service directly because that will be overwritten by docker-ce package updates (I’m sure about that: I’ve seen it).
Instead, we first create the file /etc/sysconfig/docker (which does not exist in docker-ce installation) by removing a few arguments that would not work in docker-ce:
1
2
3
4
5
# Modify these options if you want to change the way the docker daemon runs
OPTIONS="--log-driver=journald \
--live-restore \
--default-ulimit nofile=1024:1024 \
"
Then, we create another service file to specify the Docker daemon execution command:
Restart docker “sudo systemctl daemon reload && sudo systemctl start docker”. Everything should now work with docker-ce!
Of course, this approach also works with a specified “–data-root” argument, as seen in the moby-engine example.
Conclusions
On a side note, it might be enough to use only a subset of arguments in the docker-ce configuration taken from moby-engine. However, I think I wasted enough time debugging these problems in Fedora, and for the time being, I’m happy with these existing configurations.
I also want to stress my disappointment about how Fedora makes developers’ lives hard in these situations. I decided to debug these Docker problems and find solutions as a challenge. However, my interest in Fedora and my initial appreciation for this distribution significantly decreased. I won’t stop using it shortly, but I will not use it as my daily driver. For that, there’s Arch! 🙂
We use cookies on our website to give you the most relevant experience by remembering your preferences and repeat visits. By clicking “Accept All”, you consent to the use of ALL the cookies. However, you may visit "Cookie Settings" to provide a controlled consent.
This website uses cookies to improve your experience while you navigate through the website. Out of these, the cookies that are categorized as necessary are stored on your browser as they are essential for the working of basic functionalities of the website. We also use third-party cookies that help us analyze and understand how you use this website. These cookies will be stored in your browser only with your consent. You also have the option to opt-out of these cookies. But opting out of some of these cookies may affect your browsing experience.
Necessary cookies are absolutely essential for the website to function properly. These cookies ensure basic functionalities and security features of the website, anonymously.
Cookie
Duration
Description
cookielawinfo-checkbox-analytics
11 months
This cookie is set by GDPR Cookie Consent plugin. The cookie is used to store the user consent for the cookies in the category "Analytics".
cookielawinfo-checkbox-functional
11 months
The cookie is set by GDPR cookie consent to record the user consent for the cookies in the category "Functional".
cookielawinfo-checkbox-necessary
11 months
This cookie is set by GDPR Cookie Consent plugin. The cookies is used to store the user consent for the cookies in the category "Necessary".
cookielawinfo-checkbox-others
11 months
This cookie is set by GDPR Cookie Consent plugin. The cookie is used to store the user consent for the cookies in the category "Other.
cookielawinfo-checkbox-performance
11 months
This cookie is set by GDPR Cookie Consent plugin. The cookie is used to store the user consent for the cookies in the category "Performance".
viewed_cookie_policy
11 months
The cookie is set by the GDPR Cookie Consent plugin and is used to store whether or not user has consented to the use of cookies. It does not store any personal data.
Functional cookies help to perform certain functionalities like sharing the content of the website on social media platforms, collect feedbacks, and other third-party features.
Performance cookies are used to understand and analyze the key performance indexes of the website which helps in delivering a better user experience for the visitors.
Analytical cookies are used to understand how visitors interact with the website. These cookies help provide information on metrics the number of visitors, bounce rate, traffic source, etc.
Advertisement cookies are used to provide visitors with relevant ads and marketing campaigns. These cookies track visitors across websites and collect information to provide customized ads.