As I wrote in this other article, I recently bought an Acer Aspire Vero, which I greatly enjoy. Of course, I immediately installed Linux on this machine. In this article, I’ll report my experience installing Ubuntu (Ubuntu 22.10 “Kinetic Kudu”) on this Acer Aspire Vero.
Although nowadays I’m mainly an Arch Linux user, when installing Linux on a brand new laptop, I typically prefer to start with Ubuntu.
Preparation
I have already downloaded the Ubuntu ISO and copied it into a USB stick with Ventoy.
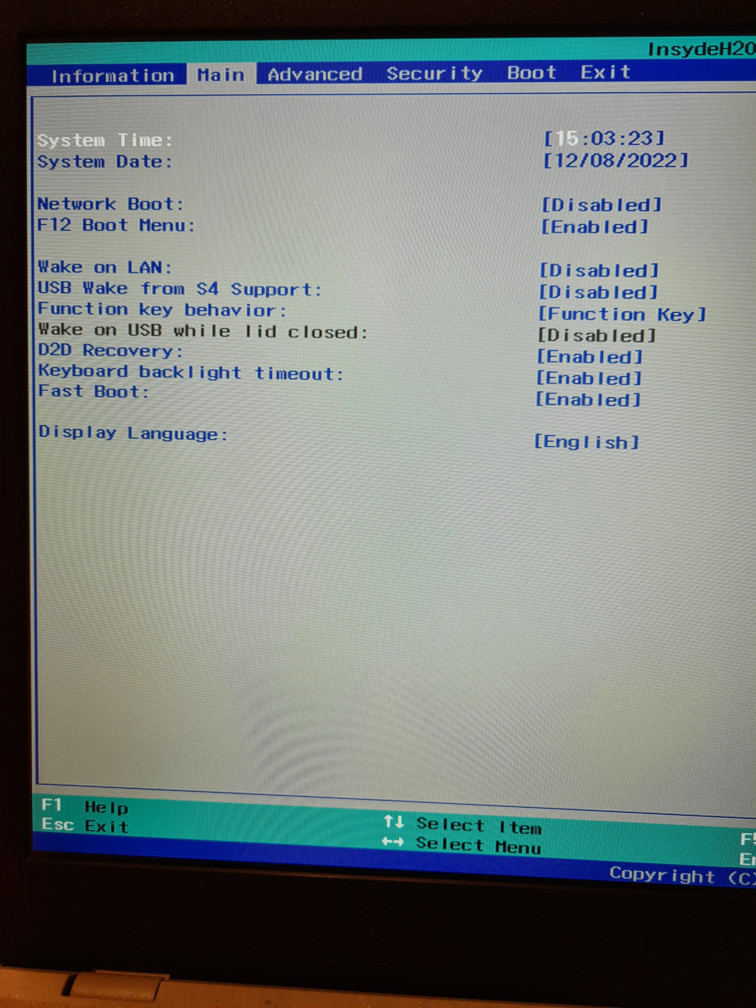
I need the F12 boot menu to boot from the USB stick. This is also useful later because I typically have several Linux distributions installed on the same computer. To enter the BIOS, you must press F2 while the laptop is booting (when you see the “Acer” logo). Make sure the “F12 Boot Menu” is enabled (by default, it’s disabled):

I also disabled “Secure Boot”. If you go to the BIOS “boot” tab, you see that you cannot change the boot entries.

The official documentation describes the procedure to make those entries changeable: https://community.acer.com/en/kb/articles/88-enable-or-disable-secure-boot-on-an-acer-notebook. The idea is to (at least temporarily) set a supervisor password (take note of that password!):


This will allow you to change the entry of “Secure Boot”:

Then, you can disable the Supervisor Password (you have to use the password you had previously chosen).

Then, it’s time to prepare some room in the SSD for Linux. I do that by shrinking the Windows partition from Windows itself. After installing a few programs on Windows (and performing the system updates), that’s the amount of used space:

I opened “Disk Management”, selected the primary partition, and used the context menu “Shrink Volume…”; since I’m not planning to use Windows much, 137Gb should be enough for the Windows partition after shrink:


And that’s the result:

Before installing Linux, I also disabled “fast startup” in Windows: this will allow me later to access the Windows partition from Linux (otherwise, the Windows partition would be in an inconsistent state):

OK, let’s reboot with the USB stick (I’m using Ventoy) and press F12 to get to the boot menu to choose to boot from the USB:

Ubuntu boots fine.
I decided first to try Ubuntu and see whether everything works in the live environment:

The sound works. I’d say that WiFi and Bluetooth are also working from the new GNOME 43 menu in the top-right corner (in fact, I can connect to my WiFi). Moreover, the “Balanced” profile is automatically selected, meaning power profiles also work.

Installation
The overall installation process went smoothly and fast.
I prefer to manually partition the disk because I want a swap partition (for hibernation), a standard EXT4 partition mounted on a directory that I will share with other Linux installations, and the root partition as BTRFS.


The installed system
So here we are on the installed system; as usual, I’m greeted by the initial setup dialog:

Wayland works and touchpad gestures work as well.
Grub detected my existing Windows installation so that I could boot Windows from the grub menu.
Usually, I have to increase the font size on my computers. This laptop provides 1920×1080 (16:9) on a 15,6 screen. Typically, I have to use Gnome Tweaks, but in this case, using the “Accessibility” menu and selecting “Large Text” was enough for having a readable screen (this corresponds to a font scaling factor of 1.25):

Power consumption
I selected “Power Saver” as the power profile in the Gnome menu, and I have installed “powertop”. I ran “sudo powertop –auto-tune,” and then I ran “sudo powertop” to see the power consumption without further interacting with the computer:


If I decrease the brightness a bit, it looks even better:

Since 9 hours is the declared time in the computer spec, I’d say Linux works great on this computer in this respect (even better than Windows).
See also later in this article another mechanism to improve power consumption.
Other configurations
I had to perform some additional tweaks, which I had already blogged about:
Finally, I read on the Arch Wiki and in other articles that it’s better to disable the VMD controller in the BIOS to optimize power consumption.
WARNING: if you disable VMD in the BIOS, Windows will refuse to boot. To avoid this problem:
- boot Windows and configure it to boot in safe mode and reboot;
- disable VMD in the BIOS (as shown in the following);
- boot Windows (in safe mode) and reboot Windows in normal mode.
To disable VMD in the BIOS, go to the “Main” section:
Press Ctrl+S to show the advanced hidden entries (including the VMD Controller) and disable it:

After rebooting into Ubuntu, I notice that the fan is almost always off, so maybe disabling VMD does something concerning power consumption.
That’s all!
Linux runs fine on this laptop! 🙂
Stay tuned for other blog posts about other Linux distributions installed on this laptop.
Pingback: Installing EndeavourOS Linux on an Acer Aspire Vero | Lorenzo Bettini
Hi, nice post by the way. I also have same laptop like yours. But the main problem between this laptop and ubuntu (and several distros i’ve tried) is suspend. This laptop’s fan and power indicator still running even the lid is closed, i believe it caused by the s2idle power state (There’s bunch article about how to switch from s2idle to deep, but it always make my laptop having blank screen when i try to resume).
Have you tried suspend with this laptop, or you switch the suspend to hibernation? also is it any bad impact of using hibernation? Thank you.
Hi
glad you enjoyed it 🙂
I confirm I have the same problem as you concerning “deep” state, so I have to stay with “s2idle” 🙁
On the contrary, hibernation works well both with Ubuntu and Arch (see my other blog posts on how to enable hibernation).
hi, after few months of “ignorance” and no suspend, finally i can achieve normal suspend with this laptop. I’m using Linux Mint 21.3 with kernel 6.5.0-35-generic right now.
i just add mem_sleep_default=deep to grub parameter (which gave me blank screen before), updating the grub, restarting the laptop, trying to suspend with closing lid, the light and fan turns off, trying to open the lid, and voila! it works well like in windows 11. maybe you should give a try 😀
Thanks for the updates!
I’ll try that ASAP.
I tried that myself again: Linux Arch, kernel version 6.9.5, and I still can’t use mem_sleep_default=deep.
If I use that in grub, upon resuming from suspend, the screen stays dark.