This is a brief article for installing exa in Arch Linux with an additional package for the icon fonts (in a few installations, boxes were shown instead of icons, that’s why I’m writing this blog article, hoping to save you some time).
Installing exa in Arch is just a matter of running:
1
sudo pacman-Sexa
However, you need a “Nerd” font to get the icon symbols. This is the one I install:
1
sudo pacman-Sttf-arimo-nerd
In EndeavourOS KDE, this should already be installed. I seem to understand that this is not the case for EndeavourOS GNOME. If these fonts are not installed, you can install them with the command above and make sure to reboot.
The output is excellent, and I aliased many of my previous ls commands to exa:
1
2
3
aliasl='exa -lah --color=always --group-directories-first --icons'# with headers
alias la='exa -al --color=always --group-directories-first --icons'# all files and dirs
alias ll='exa -l --color=always --group-directories-first --icons'# long format
This is the beautiful colored output you get, and note the icons for directories and known files types in Gnome (in particular, a “cup of coffee” for Java files):
The same holds for KDE:
I also have another alias for the tree output of exa:
1
alias lt='exa -aT --color=always --group-directories-first --icons'# tree listing
And this is the output:
Note the “–git-ignore” command line argument to ask exa to skip all the files that match the patterns in the current “.gitignore” file.
In Arch Linux (and Arch-based distros like EndeavourOS), it’s easy to add a network printer if you already know its address. Still, network printer discovery does not work out of the box as it happens on other distributions like Fedora or Ubuntu.
The procedure to enable network printer discovery is, of course, documented in the Arch wiki. Still, in this post, I’d like to detail the steps to achieve that just as a confirmation or as additional help documentation.
First of all, let’s install the packages for printing:
1
cups cups-filters cups-pdf cups-pk-helper libcups
I also install the following packages for drivers and HP (because I have HP printers):
We must also make sure the following packages (“avahi” and “nss-mdns”) are installed:
1
2
3
4
extra/avahi ... (Installed)
Service Discovery for Linux using mDNS/DNS-SD -- compatible with Bonjour
extra/nss-mdns ... (Installed)
glibc plugin providing host name resolution via mDNS
And that the “avahi-daemon.service” is running and enabled:
1
2
sudo systemctl start avahi-daemon
sudo systemctl enable avahi-daemon
Then, we must edit the file “/etc/nsswitch.conf” and change the line
1
hosts: mymachines resolve [!UNAVAIL=return] files myhostname dns
into
1
hosts: mymachines mdns_minimal [NOTFOUND=return] resolve [!UNAVAIL=return] files myhostname dns
Now, we should be able to discover local network printers.
I prefer the “system-config-printer” package for this purpose (in case you want to install it).
You can run it by searching for the application “Print Settings”. I’m showing an example in KDE:
“Unlock” by providing the password, press “Add,” and expand the “Network Printer”. If you have a firewall, like “firewalld”, you’ll be asked again for the password to change the firewall settings to enable the services for printer discovery:
Of course, you have to accept to adjust the firewall.
Then, the local network printer(s) should be discovered. In my example, my HP printer is discovered with the possible network protocols:
I chose the second one (the one with the local IP address) and HPLIP as the connection protocol (remember I had already installed the corresponding packages):
By pressing “Forward”, you wait for the drivers to be selected. You can print a “test page” and configure the printer as you see fit.
19 February 2023: exclude ansible-lint problems on tests/test.yml
27 April 2023: updated the molecule docker plugin
Last year, I got familiar with Ansible, the automation platform I now use to install and configure my Linux installations. I must thank Jeff Geerling and his excellent book “Ansible for DevOps“, which I highly recommend!
In this blog post, I’d like to document the use of Ansible and Molecule with a slightly more advanced example and how to test an Ansible role against 3 main Linux distributions, Fedora, Ubuntu, and Arch. To test the Ansible role, we will use Molecule and Docker. Finally, I’ll show how to implement a continuous integration process with GitHub Actions. The example consists of a role for installing zsh, setting it as the user’s default shell, and creating an initial “.zshrc” file. It will be a long post because it will be step-by-step.
I’m assuming Docker, Python, and Pip are already installed.
First, let’s install Ansible and Molecule (with Docker support). We’ll use pip to install these tools. This method works on all distributions since it’s independent of the ansible and molecule packages provided by the distribution (Ubuntu does not even provide a package for molecule):
What I do next is to enter the directory, remove “.travis.yml” (since we want to build on GitHub Actions), and create a Git repository (with “git init”). I’m also pushing to GitHub.
First, let’s adjust the file meta/main.yml with the information about this role and author:
YAML
1
2
3
4
5
galaxy_info:
role_name: zsh_role
author: Lorenzo Bettini
namespace: lorenzobettini
description: Install ZSH and set it as the user's shell
The role’s name should be the same as the one specified in the “init” command (I don’t know why this file has not been generated with the role_name already set). Otherwise, the other generated files for Molecule will not work.
The role’s main tasks are defined in tasks/main.yml. Currently, the generated file does not execute any task.
Manual tests
The “init” command also created a tests directory to manually and locally test the role. We are interested in automatically testing the role. However, since the role is currently empty, it is safe to try to run it against our own machine. At least, we can check that the syntax of the role is OK, and we can perform a “dry-run” without modifying anything on our machine.
The current contents of the files generated in the “tests” directory will not work out of the box.
First, the tests/test.yml playbook:
YAML
1
2
3
4
5
---
- hosts: localhost
remote_user: root
roles:
-zsh_role
Correctly refers to our role, but ansible will not be able to find the role in the default search path (because the role is the project’s path).
We can change the role reference with a relative path (the use of a relative path will require a few configurations to make linting happy, as we will see later):
YAML
1
2
3
4
5
6
---
- name: Test the role locally
hosts: localhost
remote_user: root
roles:
-../..
Then, we can try to run it, checking the syntax and doing a “dry-run”:
fatal: [localhost]: UNREACHABLE! => {"changed": false, "msg": "Failed to connect to the host via ssh: ssh: connect to host localhost port 22: Connection refused", "unreachable": true}
PLAY RECAP **************************************************************************
The “dry-run” (–check) fails because, on my machine, there’s no SSH server, and by default, the tests/inventory file (specifying “localhost”) would imply an SSH connection:
1
localhost
To avoid SSH, we can change the file as follows:
1
localhost ansible_connection=local
Let’s try again with the “–check” argument, and now it works.
Run the complete Molecule default scenario
The “init” command created a default Molecule scenario in the file default/molecule.yml:
YAML
1
2
3
4
5
6
7
8
9
10
11
12
13
---
dependency:
name: galaxy
driver:
name: docker
platforms:
- name: instance
image: quay.io/centos/centos:stream8
pre_build_image: true
provisioner:
name: ansible
verifier:
name: ansible
As we can see from this file, the Docker image used by Molecule is centos:stream8. For the moment, we’ll stick with this image.
Molecule will execute a playbook against a Docker container of this Docker image. We’re implementing a role, not a playbook. The playbook is defined in the file default/converge.yml:
YAML
1
2
3
4
5
6
7
---
- name: Converge
hosts: all
tasks:
- name: "Include lorenzobettini.zsh_role"
include_role:
name: "lorenzobettini.zsh_role"
In fact, “converge” is the action of performing the playbook against the Docker image, the “instance”. As you see, the “init” command generated this file automatically based on the role that we created.
There’s also a default/verify.yml file that is used to verify that some expected conditions are true once we run the playbook against the Docker instance. We’ll get back to this file later to write our own assertions. The contents of this generated file are as follows (the assertion is always verified):
YAML
1
2
3
4
5
6
7
8
9
10
---
# This is an example playbook to execute Ansible tests.
- name: Verify
hosts: all
gather_facts: false
tasks:
- name: Example assertion
ansible.builtin.assert:
that: true
To check that the scenario already works, we can run it end-to-end with the command “molecule test” issued from the project’s root. Remember that Molecule will download the Docker image during the first run, which takes time, depending on your Internet connection. This is the simplified output:
1
2
3
4
5
6
7
8
9
10
11
12
13
14
15
16
17
18
19
20
21
22
23
24
25
26
27
28
29
30
31
32
33
34
35
36
37
38
39
40
41
42
43
44
45
46
47
48
49
50
51
52
53
54
55
56
57
58
59
60
61
62
63
64
65
66
67
68
69
70
71
72
73
74
75
76
77
78
79
80
81
82
83
84
85
86
87
88
89
90
91
92
93
> molecule test
INFO default scenario test matrix: dependency, lint, cleanup, destroy, syntax, create, prepare, converge, idempotence, side_effect, verify, cleanup, destroy
INFO Performing prerun with role_name_check=0...
...
INFO Running default > dependency
WARNING Skipping, missing the requirements file.
WARNING Skipping, missing the requirements file.
INFO Running default > lint
INFO Lint is disabled.
INFO Running default > cleanup
WARNING Skipping, cleanup playbook not configured.
INFO Running default > destroy
INFO Sanity checks: 'docker'
PLAY [Destroy] *****************************************************************
Thus running the entire scenario always implies starting from scratch, that is, from a brand new Docker container (of course, the pulled image will be reused). Note that after “converge,” the scenario checks “idempotence,” which is a desired property of Ansible roles and playbooks. After verification, the Docker instance is also destroyed. Of course, if any of these actions fail, the lifecycle stops with failure.
Setup the CI on GitHub Actions
Our role doesn’t do anything yet, but we verified that we could run the complete Molecule scenario. Before going on, let’s set up the GitHub Actions CI workflow. We’ll use the Ubuntu runner, where Docker and Python are already installed. We’ll have first to install ansible and molecule with pip, and then we run the “molecule test”.
Concerning the pip installation step, I created the file pip/requirements.txt in the project with these contents (they correspond to the pip packages we installed on our machine):
Then, I create the file .github/workflows/molecule-ci.yml with these contents:
YAML
1
2
3
4
5
6
7
8
9
10
11
12
13
14
15
16
17
18
19
20
21
22
23
24
25
26
27
28
29
30
31
32
33
---
name: Molecule CI
on:
push:
paths-ignore:
-'**.md'
pull_request:
paths-ignore:
-'**.md'
jobs:
test:
name: Molecule
runs-on: ubuntu-latest
steps:
- name: Check out the codebase.
uses: actions/checkout@v2
- name: Set up Python 3.
uses: actions/setup-python@v4
with:
python-version: '3.x'
- name: Install test dependencies.
run: pip install -r pip/requirements.txt
- name: Run Molecule tests.
run: molecule test
env:
PY_COLORS: '1'
ANSIBLE_FORCE_COLOR: '1'
Now that our CI is in place, GitHub Actions will run the complete Molecule test scenario at each pushed commit. The environment variables at the end of the file will allow for colors in the GitHub Actions build output:
Familiarize with Molecule commands
While implementing our role, we could run single Molecule commands instead of the whole scenario (which, in any case, will be executed by the CI).
With “molecule create,” we create the Docker instance. Unless we run “molecule destroy” (which is executed by the entire scenario at the beginning), the Docker container will stay on our machine. Once the instance is created, you can enter the container with “molecule login“. This is useful to inspect the state of the container after running the playbook (with “molecule converge“) or to run a few commands before writing the tasks for our role:
The “login” command is more straightforward than running a “docker” command to enter the container (you don’t need to know its name). Remember that unless you run “molecule destroy,” you’ll find the same state if you exit the container and back in.
Once you run “molecule converge“, you can run “molecule verify” to check that the assertions hold.
To get rid of the instance, just run “molecule destroy“.
Let’s start implementing our role’s tasks
To start experimenting with Molecule for testing Ansible roles, the official Fedora Docker image is probably the easiest. In fact, such an image comes with “python” already installed (and that’s required to run Ansible playbooks). Moreover, it also contains “sudo”, another command typically used in Ansible tasks (when using “become: yes”).
Thus, let’s change the image in the file default/molecule.yml:
YAML
1
2
3
4
5
6
7
8
9
10
11
12
13
---
dependency:
name: galaxy
driver:
name: docker
platforms:
- name: instance
image: fedora:36
pre_build_image: true
provisioner:
name: ansible
verifier:
name: ansible
You can commit, push, and let GitHub Actions verify that everything is still OK.
Now it’s time to edit the primary role’s file, tasks/main.yml. Let’s add the task to install ZSH. In this example, I’m using “ansible.builtin.package module – Generic OS package manager” so that we are independent of the target OS. This is useful later because we want to test our role against different Linux distributions. This Ansible module is less powerful than the specific package manager modules, but for our goals, it is sufficient. Moreover, in the Linux distributions that we’ll test, the name of the package for ZSH is always the same, “zsh”.
YAML
1
2
3
4
5
6
7
---
# tasks file for zsh_role
- name: Install ZSH
become: yes
ansible.builtin.package:
name: zsh
state: present
If we had already created the instance, we first need to run “molecule destroy” to avoid errors due to the previous Docker container.
Let’s run “molecule converge“. If you don’t have the “fedora:36” Docker image already in your cache, this command will take some time the first time. Moreover, also the task of installing the “zsh” package might take some time since the package must be downloaded from the Internet, not to mention that dnf is not the fastest package manager on earth. In fact, the Ansible package module will use the distribution package manager, that is, dnf in Fedora. Here’s the output:
1
2
3
4
5
6
7
8
9
10
11
12
PLAY [Converge] ****************************************************************
Let’s enter the container with “molecule login“. Now, zsh should be installed in the container:
Of course, you could always run the entire “molecule test,” but that takes more time, and for the moment, we don’t have anything to verify yet. The idempotency of the Anslibe package module implies Idempotency.
Change the user’s shell and verify it
Now, we want to change the user’s shell to zsh, and we will verify it. Let’s follow a Test-Driven Development approach, which I’m a big fan of. We first write the verification tasks in verify.yml, make sure that “molecule verify” fails, and then implement the task in our role to make the test succeed.
First, how to get the user’s shell? In the Docker container, the $SHELL environment variable is not necessarily set, so we directly inspect the contents of the file “/etc/passwd” and some shell commands to get the user’s current shell. To write the shell commands, we can enter the container (molecule login), assuming we have already created the instance, and perform some experiments there. Remember that when we’re inside the container, we are “root”, so in our experiments, we’ll try to get the root’s shell.
So, we have our shell piped command to get the root’s shell:
1
grep-E"^root:"/etc/passwd|awk-F:'{ print $7 }'
In verify.yml, we want to get the shell of the user executing Ansible. In our molecule tests, it will be root, but the user will be different in the general use case. Thus, we use Ansible’s fact “ansible_user_id”:
Then, we’ll compare it against the desired value, NOT “/bin/bash”, but “/bin/zsh”. Note that, by default, the generated molecule/verify.yml has “gather_facts: false”. We need to remove or set that line to true so that Ansible populates the variable with the current user. Here are the contents (we must use the module “shell” and not “command” because we need the “|”):
As usual, we commit, push, and let the CI run the whole scenario.
The verification would not be really required since we should rely on the correctness of the Ansible user module). However, I thought this could be the moment to experiment with Molecule verification.
Note that if you enter the container, the “/etc/passwd” has been modified, but you’re still on bash. That’s because the change becomes effective when you log out and log in as a user. In a Docker container, that’s not possible, as far as I know. However, since log out and login are expected in a real system, as long as the shell is modified in “/etc/passwd”, we’re fine.
Add the file .zshrc
Since we want to set up zsh for the user, we should also add to the converged system a “.zshrc” with some reasonable defaults. For example, if you enter the container and run zsh, you’ll see that you have no command history. The history should be enabled in the file “.zshrc”.
Files are searched for in the directory “files” of the project, which the “init” command created for us. I had an existing small “.zshrc” with the enabled history, command completion, and a few aliases:
Shell
1
2
3
4
5
6
7
8
9
10
11
12
13
14
15
16
17
autoload-Uz compinit
compinit
HISTFILE=~/.histfile
HISTSIZE=1000
SAVEHIST=1000
setopt autocd beep extendedglob nomatch notify
bindkey-e
aliasgrep='grep --color=auto'
aliasl.='ls -d .* --color=auto'
aliasll='ls -l --color=auto'
aliasls='ls --color=auto'
aliasl='ls -lah'
aliasla='ls -lAh'
aliasmv='mv -i'
aliasrm='rm -i'
I put such a file in files/zshrc (I prefer not to have hidden source files, so I removed the “.”). In the role, I added this task, which copies the source file into the converged system in the current user’s home directory with the name “.zshrc”:
YAML
1
2
3
4
5
- name: Copy zshrc
ansible.builtin.copy:
src: zshrc
dest: ~/.zshrc
mode: 0644
Of course, the “copy module” is idempotent and performs the action only if the source and the target files differ.
Let’s converge, enter the Docker container and run “zsh”. Now, the command history works.
Linting
Let’s enable linting to the Molecule scenario. Remember that the scenario has an initial phase for linting.
First of all, we have to install the two additional pip packages, yamllint, and ansible-lint. In our system, we run the following:
1
pip install yamllint ansible-lint
Of course, for the CI, we have to update pip/requirements.txt accordingly, adding these two packages.
Then, we have to enable the “lint:” section in default/molecule.yml:
YAML
1
2
3
4
5
6
7
8
9
10
11
12
13
14
15
16
17
---
dependency:
name: galaxy
driver:
name: docker
lint: |
set-e
yamllint.
ansible-lint
platforms:
- name: instance
image: fedora:36
pre_build_image: true
provisioner:
name: ansible
verifier:
name: ansible
Before going on, let’s exclude our “tests/test.yml” file from ansible-lint: as mentioned above, using a relative path will make ansible-lint complain. However, for that simple test file we don’t care. So, let’s create a file “.ansible-lint” in the root directory with these contents:
YAML
1
2
3
# to avoid "role-name[path]: Avoid using paths when importing roles. (../..)"
exclude_paths:
-tests/
Now we can run “molecule lint“:
1
2
3
4
5
6
7
8
9
10
11
12
13
14
15
16
17
18
19
20
21
22
23
24
25
26
27
28
29
30
31
32
33
34
35
36
37
38
39
40
41
42
43
44
45
46
47
48
49
50
51
52
53
54
55
56
57
58
59
> molecule lint
...
INFO Running default > lint
WARNING Listing 6 violation(s) that are fatal
meta-incorrect: Should change default metadata: license
meta/main.yml:1
meta-no-info: Role info should contain platforms
meta/main.yml:1
schema[meta]: 2.1 is not of type 'string' (warning)
meta/main.yml:1 Returned errors will not include exact line numbers, but they will mention
the schema name being used as a tag, like ``schema[playbook]``,
``schema[tasks]``.
This rule is not skippable and stops further processing of the file.
Schema bugs should be reported towards [schemas](https://github.com/ansible/schemas) project instead of ansible-lint.
If incorrect schema was picked, you might want to either:
* move the file to standard location, so its file is detected correctly.
* use ``kinds:`` option in linter config to help it pick correct file type.
fqcn[action-core]: Use FQCN for builtin module actions (include_role).
molecule/default/converge.yml:5 Use `ansible.builtin.include_role` or `ansible.legacy.include_role` instead.
no-changed-when: Commands should not change things if nothing needs doing.
molecule/default/verify.yml:8 Task/Handler: Get current user's shell
risky-shell-pipe: Shells that use pipes should set the pipefail option.
molecule/default/verify.yml:8 Task/Handler: Get current user's shell
You can skip specific rules or tags by adding them to your configuration file:
# .config/ansible-lint.yml
warn_list: # or 'skip_list' to silence them completely
- experimental # all rules tagged as experimental
- fqcn[action-core] # Use FQCN for builtin actions.
- meta-incorrect # meta/main.yml default values should be changed.
- meta-no-info # meta/main.yml should contain relevant info.
- no-changed-when # Commands should not change things if nothing needs doing.
- risky-shell-pipe # Shells that use pipes should set the pipefail option.
Commit and push. Everything should work on GitHub Actions.
Note: when we created the project with “molecule init”, the command also created a “.yamllint” configuration file in the root:
YAML
1
2
3
4
5
6
7
8
9
10
11
12
13
14
15
16
17
18
19
20
21
22
23
24
25
26
27
28
29
30
31
32
33
---
# Based on ansible-lint config
extends: default
rules:
braces:
max-spaces-inside: 1
level: error
brackets:
max-spaces-inside: 1
level: error
colons:
max-spaces-after: -1
level: error
commas:
max-spaces-after: -1
level: error
comments: disable
comments-indentation: disable
document-start: disable
empty-lines:
max: 3
level: error
hyphens:
level: error
indentation: disable
key-duplicates: enable
line-length: disable
new-line-at-end-of-file: disable
new-lines:
type: unix
trailing-spaces: disable
truthy: disable
This configuration file enables and disables linting rules. This is out of the scope of this post. However, to experiment a bit, if we remove the last line “truthy: disable” and run “molecule lint,” we get new linting violations:
1
2
3
./tasks/main.yml
4:11 warning truthy value should be one of [false, true] (truthy)
10:11 warning truthy value should be one of [false, true] (truthy)
Because “become: yes” should be changed to “become: true”. I guess it’s a matter of taste whether to enable such a linting rule or not. I’ve seen many examples of Ansible files with “become: yes”. After fixing “main.yml”, there is still a warning (not an error) on the YAML file of our GitHub Actions in correspondence with the “on” line:
1
2
./.github/workflows/molecule-ci.yml
3:1 warning truthy value should be one of [false, true] (truthy)
You can find a few issues on this being considered false positive or not. A simple workaround is to add a comment in the “molecule-ci.yml” file to make yamllint skip that:
YAML
1
on: # yamllint disable-line rule:truthy
Testing with Ubuntu, the “prepare” step
Let’s say that, besides “fedora:36“, we also want to test our role against the Docker image “ubuntu:jammy“. Instead of creating a new scenario (i.e., another directory inside the directory “molecule”), let’s parameterize the molecule.yml with an environment variable, e.g., MOLECULE_DISTRO, which defaults to “fedora:36”, but that can be passed on the command line with a different value. This is the interesting part:
YAML
1
2
3
4
5
6
...
platforms:
- name: instance
image: ${MOLECULE_DISTRO:-fedora:36}
pre_build_image: true
...
Nothing changes if we run molecule commands as we did before: we still use the Fedora Docker image. If we want to try with another image, like “ubuntu:jammy”, we prefix the molecule command with that value for our environment variable.
IMPORTANT: Before trying with another Docker image, make sure you run “molecule destroy” since now we want to use a different Docker image.
Let’s try to converge with the Ubuntu Docker image…
1
MOLECULE_DISTRO=ubuntu:jammy molecule converge
What could go wrong?
1
2
3
4
5
6
7
8
9
INFO Running default > converge
PLAY [Converge] ****************************************************************
fatal: [instance]: FAILED! => {"ansible_facts": {}, "changed": false, "failed_modules": {"ansible.legacy.setup": {"ansible_facts": {"discovered_interpreter_python": "/usr/bin/python"}, "failed": true, "module_stderr": "/bin/sh: 1: /usr/bin/python: not found\n", "module_stdout": "", "msg": "The module failed to execute correctly, you probably need to set the interpreter.\nSee stdout/stderr for the exact error", "rc": 127}}, "msg": "The following modules failed to execute: ansible.legacy.setup\n"}
PLAY RECAP *********************************************************************
As I anticipated, while the Fedora Docker image comes with python preinstalled, the Ubuntu Docker image does not. The latter does not even have “sudo” installed, which is required for running our tasks with “becomes: yes”. The converge failed, but the Ubuntu image has been created so you can enter the Docker container and verify that these packages are not pre-installed.
One could try to add the tasks in the role to install python and sudo (not by using “package” because such Ansible modules require python already installed). However, this would not make sense: our role is meant to be executed against an actual distribution, where these two packages are already installed as base ones. Jeff Geerling provides a few Docker images meant for Ansible, where python and sudo are already installed. However, instead of using his Ubuntu image, let’s explore another Molecule step: prepare.
The prepare playbook executes actions which bring the system to a given state prior to converge. It is executed after create, and only once for the duration of the instances life. This can be used to bring instances into a particular state, prior to testing.
So, let’s modify this part in molecule.yml (this modification is not strictly required because if the directory of molecule/default contains a file “prepare.yml,” it will be automatically executed; it might still be good to know how to specify such a file, in case it’s in a different directory or it has a different name):
YAML
1
2
3
4
5
6
...
provisioner:
name: ansible
playbooks:
prepare: prepare.yml
...
Now, in molecule/prepare.yml we create the preparation playbook. This is kind of challenging because we cannot rely on Ansible facts nor on most of its modules (remember: they require python, which we want to install in this playbook). We can rely on the “ansible.builtin.raw module – Executes a low-down and dirty command”. And looking at its documentation, we can see that it fits our needs:
This is useful and should only be done in a few cases. A common case is installing python on a system without python installed by default.
So, here’s the prepare.yml playbook:
YAML
1
2
3
4
5
6
7
8
9
10
11
---
- name: Prepare
hosts: all
gather_facts: false
tasks:
- name: Install python in Ubuntu
ansible.builtin.raw: >
aptupdate&&\
aptinstall-y--no-install-recommendspython3sudo
when: "'ubuntu' is in lookup('ansible.builtin.env','MOLECULE_DISTRO')"
changed_when: false
Of course, we must run this task only when we are using Ubuntu (see the condition). We also specify “changed_when: false” to avoid linting problems (“no-changed-when # Commands should not change things if nothing needs doing.”).
Running “molecule converge” now succeeds (note the “prepare” step):
1
2
3
4
5
6
7
8
9
10
11
12
13
14
15
16
17
18
19
20
21
22
23
24
25
26
27
28
29
30
31
32
33
34
35
> MOLECULE_DISTRO=ubuntu:jammy molecule converge
...
INFO Running default > create
WARNING Skipping, instances already created.
INFO Running default > prepare
INFO Sanity checks: 'docker'
PLAY [Prepare] *****************************************************************
TASK [Install python in Ubuntu] ************************************************
changed: [instance]
PLAY RECAP *********************************************************************
But it doesn’t. That’s because the “pipefail” we added to make lint happy works in bash but not in sh, which is used by default in Ubuntu (in Fedora, it was bash). It’s just a matter of adjusting that verification’s task accordingly:
YAML
1
2
3
4
5
6
7
...
- name: Get current user's shell
...
register: user_shell
args:
executable: /bin/bash
changed_when: false
And now verification succeeds in Ubuntu as well.
If you run this against Fedora (remember that you must destroy the Ubuntu instance first), the task “Install python in Ubuntu” will be skipped.
Note that if you run
Let’s try to converge with the Ubuntu Docker image…
1
MOLECULE_DISTRO=ubuntu:jammy molecule converge
and then execute
1
molecule login
Molecule will reuse the image just created: it does not recreate the Docker image even if you haven’t specified any environment variable. This means that, as mentioned above, if you want to test with another value of the environment variable (including the default case), you first have to destroy the current image. By defining several scenarios, as we will see in a minute, there’s no such limitation.
Add a GitHub Actions build matrix
Let’s modify the GitHub Actions workflow to test our role with Fedora and Ubuntu in two jobs using a build matrix. These are the relevant parts to change to use the environment variable MOLECULE_DISTRO that we introduced in the previous section:
YAML
1
2
3
4
5
6
7
8
9
10
11
12
13
14
15
16
17
...
test:
name: Molecule
runs-on: ubuntu-latest
strategy:
fail-fast: false
matrix:
playbookdistro:
- fedora:36
- ubuntu:jammy
...
- name: Run Molecule tests.
run: molecule test
env:
PY_COLORS: '1'
ANSIBLE_FORCE_COLOR: '1'
MOLECULE_DISTRO: ${{matrix.playbookdistro}}
Now GitHub Actions will execute two jobs for each pushed commit:
Using different scenarios
We now see a different technique to test with different Linux distributions. Instead of using an environment variable to parameterize Molecule, we create another Molecule scenario. To do that, it’s enough to create another subdirectory inside the “molecule” directory. We’ll use the “Ubuntu” example to see this technique in action. (Before doing that, remember to run “molecule destroy” first).
First, let’s undo the modification we did in the file “molecule.yml”:
YAML
1
2
3
4
platforms:
- name: instance
image: fedora:36
pre_build_image: true
And let’s create another subdirectory, say “ubuntu”, inside “molecule”, where we create this “molecule.yml” file (it’s basically the same as the one inside “default” where we specify “ubuntu:jammy” and a different name for the “image”):
YAML
1
2
3
4
5
6
7
8
9
10
11
12
13
14
15
16
17
---
dependency:
name: galaxy
driver:
name: docker
lint: |
set-e
yamllint.
ansible-lint
platforms:
- name: instance-ubuntu
image: ubuntu:jammy
pre_build_image: true
provisioner:
name: ansible
verifier:
name: ansible
Let’s copy the “default/verify.yml” and “default/converge.yml” into this new directory, and let’s move the “default/prepare.yml” into this new directory, where we change the contents as follows (that is, we get rid of the “when” condition since this will be used only in this new scenario):
YAML
1
2
3
4
5
6
7
8
9
10
---
- name: Prepare
hosts: all
gather_facts: false
tasks:
- name: Install python in Ubuntu
ansible.builtin.raw: >
aptupdate&&\
aptinstall-y--no-install-recommendspython3sudo
changed_when: false
To summarize, this should be the layout of the “molecule” directory (we’ll get rid of duplicated contents in a minute):
1
2
3
4
5
6
7
8
9
10
molecule
├── default
│ ├── converge.yml
│ ├── molecule.yml
│ └── verify.yml
└── ubuntu
├── converge.yml
├── molecule.yml
├── prepare.yml
└── verify.yml
Now, running any molecule command will use the “default” scenario. If we want to execute molecule commands against the “ubuntu” scenario, we must use the argument “-s ubuntu” (where “-s” is the short form of the command line argument “–scenario-name”).
For example
1
2
3
4
5
6
7
8
# converge using Fedora
molecule converge
# converge using Ubuntu
molecule converge-subuntu
# enter the Fedora instance created with the first command
molecule login
# enter the Ubuntu instance created with the second command
molecule login-subuntu
So we can converge, verify, and experiment with the two scenarios without destroying a previously created instance.
Of course, we adapt the GitHub Actions workflow accordingly to use scenarios instead of environment variables:
Let’s move the shared files “verify.yml” and “converge.yml” to a new subdirectory, say “shared”. So the layout should be as follows:
1
2
3
4
5
6
7
8
9
molecule
├──default
│└──molecule.yml
├──shared
│├──converge.yml
│└──verify.yml
└──ubuntu
├──molecule.yml
└──prepare.yml
The last part of both “molecule.yml” files in “default” and “ubuntu” must be changed to refer to files in another directory (note that the “verifier” part has been removed since it’s specified in the “provisioner” part):
YAML
1
2
3
4
5
6
...
provisioner:
name: ansible
playbooks:
converge: ../shared/converge.yml
verify: ../shared/verify.yml
Now we reused the common files between the two scenarios. Of course, we verify that everything still works in both scenarios.
Testing with Arch, a custom Dockerfile
Let’s now test this simple role also with Arch Linux. The idea is to create another scenario, e.g., another subdirectory, say “arch”. We could follow the same technique that we used for Ubuntu because also the Arch Docker image has to be “prepared” with “python” and “sudo”. However, to try something different, let’s rely on a custom Docker image specified with a Dockerfile.
The “molecule.yml” in the “arch” directory is as follows:
YAML
1
2
3
4
5
6
7
8
9
10
11
12
13
14
15
16
17
18
19
20
---
dependency:
name: galaxy
driver:
name: docker
lint: |
set-e
yamllint.
ansible-lint
platforms:
- name: instance-arch
image: arch-ansible
platform: linux/amd64
dockerfile: ./Dockerfile
build_image: true
provisioner:
name: ansible
playbooks:
converge: ../shared/converge.yml
verify: ../shared/verify.yml
NOTE: the specification “platform: linux/amd64” is not required because we use a custom Dockerfile. It is required if you want to test this scenario on a Mac m1 (by the way, see my other blog post about Docker on a Mac m1): while Ubuntu and Fedora also provide Docker images for the aarch64 (arm) architecture, Arch Linux does not. So we must force the use of the Intel platform on Arm architectures (of course, on Mac m1, the Docker container will be emulated).
And in the same directory, we create the Dockerfile for our Arch Docker image:
1
2
3
4
5
6
FROM archlinux:latest
LABEL maintainer="Lorenzo Bettini"
RUN pacman -Sy --noconfirm --needed python sudo
CMD ["/bin/sh"]
For this example, the Docker image for Arch is simple because we only need “python” and “sudo” to test our role.
Now the directory layout should be as follows:
1
2
3
4
5
6
7
8
9
10
11
12
molecule
├── arch
│ ├── Dockerfile
│ └── molecule.yml
├── default
│ └── molecule.yml
├── shared
│ ├── converge.yml
│ └── verify.yml
└── ubuntu
├── molecule.yml
└── prepare.yml
Now, when Molecule creates the instance, it will use our custom Dockerfile.
We verify that the “arch” scenario also works and update the GitHub Actions workflow by adding “arch” to the scenario matrix.
I hope you find this post helpful in getting started with Ansible and Molecule.
As I wrote in this other article, I recently bought an Acer Aspire Vero, which I greatly enjoy. Of course, I immediately installed Linux on this machine. In this article, I’ll report my experience installing Ubuntu (Ubuntu 22.10 “Kinetic Kudu”) on this Acer Aspire Vero.
Although nowadays I’m mainly an Arch Linux user, when installing Linux on a brand new laptop, I typically prefer to start with Ubuntu.
Preparation
I have already downloaded the Ubuntu ISO and copied it into a USB stick with Ventoy.
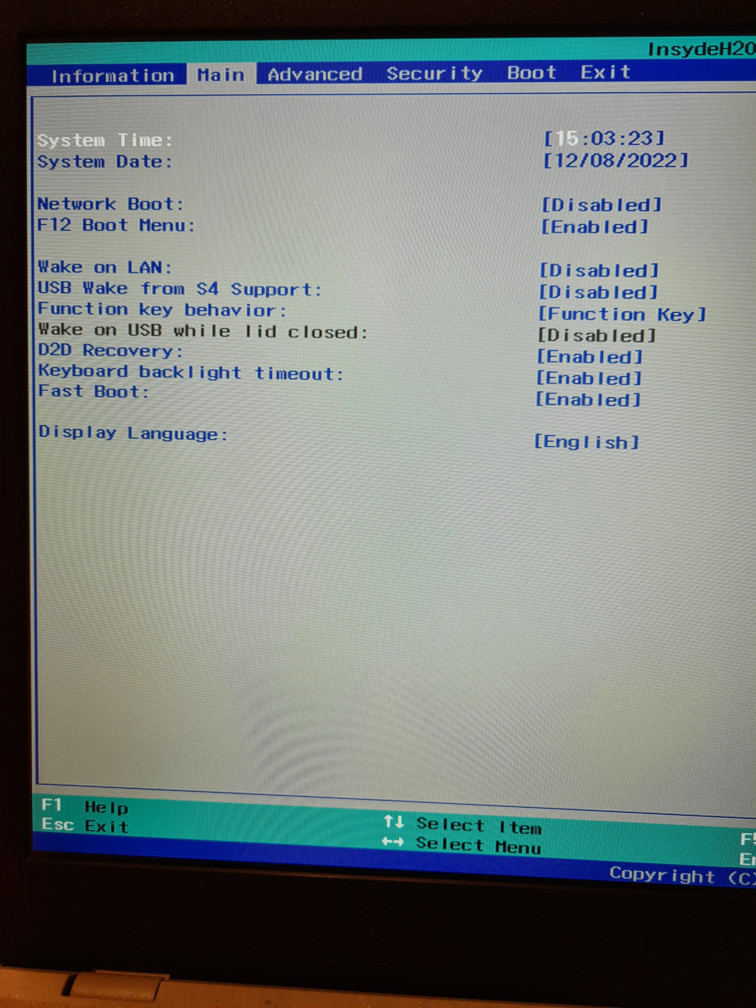
I need the F12 boot menu to boot from the USB stick. This is also useful later because I typically have several Linux distributions installed on the same computer. To enter the BIOS, you must press F2 while the laptop is booting (when you see the “Acer” logo). Make sure the “F12 Boot Menu” is enabled (by default, it’s disabled):
I also disabled “Secure Boot”. If you go to the BIOS “boot” tab, you see that you cannot change the boot entries.
This will allow you to change the entry of “Secure Boot”:
Then, you can disable the Supervisor Password (you have to use the password you had previously chosen).
Then, it’s time to prepare some room in the SSD for Linux. I do that by shrinking the Windows partition from Windows itself. After installing a few programs on Windows (and performing the system updates), that’s the amount of used space:
I opened “Disk Management”, selected the primary partition, and used the context menu “Shrink Volume…”; since I’m not planning to use Windows much, 137Gb should be enough for the Windows partition after shrink:
And that’s the result:
Before installing Linux, I also disabled “fast startup” in Windows: this will allow me later to access the Windows partition from Linux (otherwise, the Windows partition would be in an inconsistent state):
OK, let’s reboot with the USB stick (I’m using Ventoy) and press F12 to get to the boot menu to choose to boot from the USB:
Ubuntu boots fine.
I decided first to try Ubuntu and see whether everything works in the live environment:
The sound works. I’d say that WiFi and Bluetooth are also working from the new GNOME 43 menu in the top-right corner (in fact, I can connect to my WiFi). Moreover, the “Balanced” profile is automatically selected, meaning power profiles also work.
Installation
The overall installation process went smoothly and fast.
I prefer to manually partition the disk because I want a swap partition (for hibernation), a standard EXT4 partition mounted on a directory that I will share with other Linux installations, and the root partition as BTRFS.
The installed system
So here we are on the installed system; as usual, I’m greeted by the initial setup dialog:
Wayland works and touchpad gestures work as well.
Grub detected my existing Windows installation so that I could boot Windows from the grub menu.
Usually, I have to increase the font size on my computers. This laptop provides 1920×1080 (16:9) on a 15,6 screen. Typically, I have to use Gnome Tweaks, but in this case, using the “Accessibility” menu and selecting “Large Text” was enough for having a readable screen (this corresponds to a font scaling factor of 1.25):
Power consumption
I selected “Power Saver” as the power profile in the Gnome menu, and I have installed “powertop”. I ran “sudo powertop –auto-tune,” and then I ran “sudo powertop” to see the power consumption without further interacting with the computer:
If I decrease the brightness a bit, it looks even better:
Since 9 hours is the declared time in the computer spec, I’d say Linux works great on this computer in this respect (even better than Windows).
See also later in this article another mechanism to improve power consumption.
Other configurations
I had to perform some additional tweaks, which I had already blogged about:
Finally, I read on the Arch Wiki and in other articles that it’s better to disable the VMD controller in the BIOS to optimize power consumption.
WARNING: if you disable VMD in the BIOS, Windows will refuse to boot. To avoid this problem:
boot Windows and configure it to boot in safe mode and reboot;
disable VMD in the BIOS (as shown in the following);
boot Windows (in safe mode) and reboot Windows in normal mode.
To disable VMD in the BIOS, go to the “Main” section:
Press Ctrl+S to show the advanced hidden entries (including the VMD Controller) and disable it:
After rebooting into Ubuntu, I notice that the fan is almost always off, so maybe disabling VMD does something concerning power consumption.
That’s all!
Linux runs fine on this laptop! 🙂
Stay tuned for other blog posts about other Linux distributions installed on this laptop.
We use cookies on our website to give you the most relevant experience by remembering your preferences and repeat visits. By clicking “Accept All”, you consent to the use of ALL the cookies. However, you may visit "Cookie Settings" to provide a controlled consent.
This website uses cookies to improve your experience while you navigate through the website. Out of these, the cookies that are categorized as necessary are stored on your browser as they are essential for the working of basic functionalities of the website. We also use third-party cookies that help us analyze and understand how you use this website. These cookies will be stored in your browser only with your consent. You also have the option to opt-out of these cookies. But opting out of some of these cookies may affect your browsing experience.
Necessary cookies are absolutely essential for the website to function properly. These cookies ensure basic functionalities and security features of the website, anonymously.
Cookie
Duration
Description
cookielawinfo-checkbox-analytics
11 months
This cookie is set by GDPR Cookie Consent plugin. The cookie is used to store the user consent for the cookies in the category "Analytics".
cookielawinfo-checkbox-functional
11 months
The cookie is set by GDPR cookie consent to record the user consent for the cookies in the category "Functional".
cookielawinfo-checkbox-necessary
11 months
This cookie is set by GDPR Cookie Consent plugin. The cookies is used to store the user consent for the cookies in the category "Necessary".
cookielawinfo-checkbox-others
11 months
This cookie is set by GDPR Cookie Consent plugin. The cookie is used to store the user consent for the cookies in the category "Other.
cookielawinfo-checkbox-performance
11 months
This cookie is set by GDPR Cookie Consent plugin. The cookie is used to store the user consent for the cookies in the category "Performance".
viewed_cookie_policy
11 months
The cookie is set by the GDPR Cookie Consent plugin and is used to store whether or not user has consented to the use of cookies. It does not store any personal data.
Functional cookies help to perform certain functionalities like sharing the content of the website on social media platforms, collect feedbacks, and other third-party features.
Performance cookies are used to understand and analyze the key performance indexes of the website which helps in delivering a better user experience for the visitors.
Analytical cookies are used to understand how visitors interact with the website. These cookies help provide information on metrics the number of visitors, bounce rate, traffic source, etc.
Advertisement cookies are used to provide visitors with relevant ads and marketing campaigns. These cookies track visitors across websites and collect information to provide customized ads.